Friday, March 28, 2014

Poppy cupcake toppers - from Kiwicakes test kitchen


Bake for ANZAC day this year and present your delights in these Black Lace cupcake papers. They really set off the center of the poppy.


The topper is formed using this new Poppy silicone mould. To begin, season the mould with a thin smear of Perfect Finish Decorating Cream by rubbing a smear all around. This ensures your topper will unmould with ease. Fill the centre with a tiny circle of black fondant and the leaf cavity with some green fondant as pictured. Lastly push in your red fondant to fill the mould (I used Satin Ice).

Once you have all your materials in front of you it takes no time at all to make these en masse to decorate for an army. As an indication it took me 10 minutes to make 6 poppies.


Order your poppy mould in advance of ANZAC day now!

Wednesday, March 26, 2014

Candy Building Block Cupcakes - from Kiwicakes test kitchen


Add some Candy Blocks to your favourite iced cupcakes to win delighted looks from children. The really authentic look of the blocks will have everybody guessing if they're edible! 

These are a really handy sweet decoration to have on hand in the kitchen for your child that loves to play with Lego.

Monday, March 24, 2014

A Carrot for the Easter Bunny - from Kiwicakes test kitchen


These striking 'carrot' treats are packaged in a cake decorator's best friend - disposable piping bags. They come in a pack of 20 and are clear and unbranded, which make them perfect for this task. The individual piping bags work out at NZ$0.40c each, so they make a very economical packaging option.


Simply fill each piping bag with your goodies (e.g. orange jellybeans) and secure with a limey green curling ribbon.


A great portable treat, these 'carrots' are perfect for Easter gifting.


For those without a sweet tooth (strange people I must say! but they do exist) consider filling the piping bags with readily-available smallish orange cheese chips. Remember to tie the ribbon tight to keep the chips airtight and fresh and these can be prepared well in advance for picnics and outings.


Tuesday, March 18, 2014

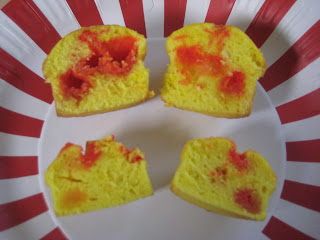
Skittles infused Cupcakes


Last year you may recall I made skittles infused vodka. I still have a heap of it I haven't used, so I decided to try skittle cupcakes, as I had plenty of candy, too. I used a regular vanilla cake mix, to which I removed 1/3 cup of water and replaced with 1/3 cup of skittle infused vodka (the alcohol actually bakes out, leaving behind the skittle flavour - it's like using an extract really, so safe for kids to eat).


I tested baking with both whole skittles and skittles cut in half.


The skittles that were cut in half were the most successful in the baked cupcakes. The whole skittles made a big gooey mess, whereas the half skittles made a nice tasty addition when eating the cupcake.


I like the simplicity topped with a single skittle. To my buttercream icing, I added 1Tbsp of skittle infused vodka (replace other liquid you'd normally add). The icing doesn't taste of alcohol, and 1 Tbsp over an entire batch of icing is such a small amount, so the kids can eat this icing, too. Just make sure to put the vodka back on the top shelf, as it's a very enticing colour for kids. 


You can find the circus cupcake papers here.

Friday, March 14, 2014

Handyman's Birthday - from Kiwicakes test kitchen


My dad has always been good at fixing things and taught us kids how to find our way around a toolbox too. He loves to tinker in his garage and emerges with beautifully crafted wooden items. So when it came to this years' birthday I thought what better way to celebrate his skill than with edible tools!


I made his AJ initials with capital letters from this alphabet cutter set. I also adapted the letter S into a number 5 by shaving off one curved edge to straight and a H was easily transformed into a number 4.

The tools were wee blobs of grey fondant pushed into this Silicone Tools Mould and painted with light gold, red and dark silver metallic food paint.

Happy Birthday Dad!

Monday, March 10, 2014

St Paddys Leprechaun - from Kiwicakes test kitchen


This crazy little leprechaun is achieved with a silicone mould, which has arrived just in time for St Paddy's day! Its just a case of pressing fondant in, snap-freezing him, then finishing with the detailing. He is presented a top these cool shamrock cupcake papers


Firstly with any new mould, give it a wash in hot water and let it air-dry. Then season it with a smidgen of crisco vegetable shortening for guaranteed easy-release. Use tiny balls of flesh coloured fondant and press them into your little man's face, ears, hand and pot as pictured above. Roll a thin sausage for the pot's handle and press into place. I love this pre-coloured fondant for skin tone because so many times I have mucked around with a small amount of my peaches and browns and can't seem to get the colour quite right. It also works well as a warm base colour for edible metallic light gold paint as you will see further down the blog.


Next I pressed green satinice fondant into the remainder of the mould.. He only weighs a few grams when completed so we are only talking about tiny amounts of fondant here! When the cavities are full, sit the mould in your freezer for a couple of minutes to firm up the fondant before turning out to release the funny little leprechaun and clover leaf. Release the feet from the leprechaun mould first and then the rest of his body will follow. Use a scalpel to do any microscopic tidying if your skin tone and green have spread a millimeter or two in the wrong direction.


I used light gold metallic paint and the finest paintbrush to highlight his little pot of gold. When he has been at room temperature for a good half an hour he will have hardened with a slight crust all over. Now its time to add wee dots for his eyeballs with an airforce blue edible marker pen and his smile with a red edible marker pen. I tried to do the facial features on mine too early when they were still too 'fresh' and ended up with less-than-perfect lines so it is worth waiting if you have that luxury.


The shamrock silicone mould (included alongside the leprechaun) is super-simple to use and looks really effective with these themed cupcake papers.


You could jazz these cupcakes up even further with the addition of some sprinkles. L-R...

Emerald green non-pareils, Shamrock mix sprinkles, Lime green gloss lustre jimmies.

You will be a hit in the office if you arrive with a tray full of these green goodies next Monday!


Friday, March 7, 2014

Mini gerbera cake


This little fruit cake might not be immediately obvious from  the photo, but it's only 4'' in diameter. It was a simple and quick birthday cake for a family member from a household of 2 people. For people in my family they can be a little daunted by the never ending supply of cake. And I sometimes hear "how am I going to eat all of that?"


To start I mixed 50% orange with 50% white satin ice fondant, to create this peach colour, which I covered the cake board with. I embossed the pattern using an impression mat. Within just 1-2 minutes, you can create a pattern that looks like it took you hours. The small cake is covered in white satin ice fondant and the top is adorned with a peach gerbera flower, made from gumpaste, dusted with flame frenzy edible lustre. The cake is finished with a 4mm pearl border from this mould.
This little cake was well received and I can promise you from start to finish the cake only took about 30 minutes to decorate. I really like the look of a single flower fitting the top diameter of the cake. What do you think?

Monday, March 3, 2014

Savoury Shamrock Stack - from Kiwicakes test kitchen

Today I continued on my St Patrick's day buzz and used our large shamrock cookie cutter to theme a quick but effective savoury snack. Gotta love no-bake, no-fuss options that taste this good.


Savoury Shamrock Stack (serves 6+)

2 packs store-bought spinach flavoured wraps (down the bread aisle)
1 packet of baby rocket leaves (or a large bowlful from your summer garden)
1 packet of onion soup mix
250g pot sour creme
1 cup mayonnaise
100g pottle of pesto 


Combine sour creme, mayo and onion soup mix and chill in advance. 


Check that you will fit two shamrocks out of each wrap then cut in half. The spinach tortillas are greener on one side and browner on the other, so be sure to reserve some nice bright green for the tops. Spread one side with 1 desert spoon of creamy mixture and 1 teaspoon of pesto on the other. These will act as the 'glue' to hold the wraps and rocket together. Fill with a generous handful of rocket (removing any excessive rocket stems) and invert the lid. You can continue building upwards and make your stacks 3 or 4 or 5 or even 6 stacks high, alternating the layers. 


Working on a hard surface like a clean bench top, press the large shamrock cookie cutter through your layers. Simply press the stack out of the cutter gently onto your serving dish to reveal the beauty. You can see how cleanly the cutter slices through the rocket and wraps to make a restaurant-looking item.


This tasty St Paddys day snack goes well with a Guiness and would be great as a picnic meal shared outside. 


We continually add to our range of cookie cutters on offer. There are nearly 30 categories to browse for all your baking, decorating and general kitchen needs.

Wednesday, February 26, 2014

White chocolate caramel macadamia truffles


These truffles came about when I agreed to take truffles to an event, but late at night after the shops were closed I discovered I didn't have the ingredients for my other recipe. 


I couldn't resist a photo for you that includes my ultimate truffle dipping tool, the humble toothpick. I've tried many of the fancy gadgets out there, but find nothing works better for me than a toothpick.

Ingredients
250g crushed Graham crackers (if you have trouble finding this biscuit in NZ, you can subsitute Round Wine biscuits)
1x Philadelphia Cream cheese block 250g.
1 Cup ground macadamia nut
250g Nestle caramel baking bits
125g white chocolate
(milk or dark chocolate to dip)

Method
Melt caramel baking bits & white chocolate together over a double boiler. Set aside to allow to cool. In a food processor, crush biscuits to a fine crumb. Add macadamia nut and cream cheese pulsing to just combine. Add cooled melted chocolate and pulse again, mixture should form a ball. Chill for at least one hour. Roll in to small balls and dip in milk or dark chocolate. Place in foil truffle cups (these are best placed in a mini muffin pan for support whilst setting) and allow to set.

Tuesday, February 18, 2014

Underwear Cupcakes from Karina at Kiwicakes


Many of you that call in store at Kiwicakes will have met Karina at the counter. She's the person responsible for making sure all our online orders are packed well to arrive in great condition at your home.


Karina recently held an Intimo underwear party at her home and made these awesome underwear cupcakes for our dessert afterwards. She used this silicone mould to make the bra & knickers. They were coloured using the same method we use to colour paua shells. The stiletto boot cupcake papers can be found here.


Karina swears by this chocolate cupcake recipe from The Farm Chicks. She says she likes it "becuase you just put everything in one bowl".

We had a great evening at our underwear party, catching up with friends and sharing a lovely meal afterwards. I think Karina did a great job of her cupcakes and I can assure you they tasted great, too.

Monday, February 17, 2014

Afghan biscuits - A kiwi kids favourite


My youngest is just starting to get interested in cooking and baking. He's always been keen to jump in to any decorating though. Today we made afghan biscuits together. The recipe comes from our friends at Chelsea.

Ingredients
200g butter, softened
½ cup Chelsea Caster or Organic Sugar
1 tsp vanilla essence
1 ¼ cups plain flour
¼ cup cocoa
1 ½ cups cornflakes, lightly crushed
Icing:
1 ½ cups Chelsea Rich Chocolate Icing
1 Tbsp butter (softened)
1-2 Tbsp boiling water

Method 
Preheat oven to 180°C. Grease or line a baking tray with baking paper.
In a large bowl beat butter, sugar and vanilla until light and fluffy. Sift in flour and cocoa stir thoroughly with the butter mixture until combined before stirring in the cornflakes.
Place heaped teaspoonfuls on a baking tray, squeeze mixture together gently if necessary then press lightly with a fork.
Bake for 15-20 minutes. Cool on a wire rack before icing. 

Icing: Mix chocolate icing sugar, butter and 1 Tbsp boiling water at a time until combined, adding more hot water if necessary until icing is a spreadable consistency. Ice biscuits and top with half a walnut.

Thursday, February 13, 2014

Valentines chocolate box heart cake


What's better than a box of chocolates for Valentines day? A chocolate box cake of course. This cake was very quick and simple to make. I baked a heart shaped chocolate mud cake.


I coated it in pink buttercream, then covered with a layer of hot pink Satin Ice fondant. To form the sides of the box I used a ribbon cutter. I cut a strip of red Satin Ice fondant to which I added some tylose (to harden). Then a box of chocolates was arranged on the top of the cake. You can use store bought or make your own chocolates or truffles.


To fill in the little gaps between the chocolates I used strings of gum paste pearls, which can be easily formed with the help of a bead maker. A scrumptious decadent treat for Valentines day in under 30 minutes.

Wednesday, February 12, 2014

Heart cookie - simple & effective tips


Recently at our monthly cake guild meeting the committee members of our guild set up different "have a go" stations. In an attempt to get all of our members trying out new techniques. Laura made this pretty heart shape cookie. Some very simple techniques were combined, to make a stylish gift of love. The smaller white heart was cut from a piece of fondant, that has been embossed with a floral texture mat from this set. It is embellished with tip#2 piped royal icing dots.

Thanks to Ann, Anne and Janelle for setting up the have a go stations at guild night.

Monday, February 10, 2014

Rainbow Valentines Love - from Kiwicakes Test Kitchen


Today's rainbow coloured heart cookies are based on traditional cutesy valentines sweets. With the romantic day approaching we want to inspire all you bakers to get inventive and show your love through your craft!


The magic tools I used were LorAnns punchy flavoured oils and droppers, Progel food colouring, Heart Cutter  and most importantly the tiny alphabet Message Maker.


To make 6 coloured cookie doughs the total quantity of ingredients you will need is:

250g block of butter, softened
2 cups sugar
1 tin condensed milk
6 cups flour + extra for dusting
baking powder, flavours and colours.

It is a big yield of 100+ cookies. It'd be too difficult to work in smaller quantities but you could reduce the number of coloured doughs you make. I figure you can never have too many cookies anyway and these freeze beautifully in snaplock bags for whenever you are ready. 

This project is not light on prep time, but don't let this put you off as the results are so worthwhile! A stand/hand mixer is essential. As a day-off activity this is the perfect way to show your love! Here is the finished product again for some motivation...


Rainbow Valentines Cookies (x6 mixtures)

Cream together: 75g softened butter, 1/3c sugar, 65g condensed milk, 6 drops LorAnn flavour oil and a small squirt of Progel colour.

Mix in: 1 scant cup flour and a rounded 1/4t baking powder to form a dough.

Repeat 6 times and wrap individual doughs in clingfilm until ready to use. Cookies take 10 mins to bake at 175`c.


The message maker is fantastic for personalising messages on any of your baking and cake decorating projects. The letters are 6mm tall so could be inconspicuous if you want them to be! I found that a pair of nail clippers worked well to snap off the joining tabs between the letter and alphabet pieces. It'd be worthwhile doing this job in advance to add such a versatile piece to your sugar craft kit. Also remember to enter the words you desire back-to-front in the stamp for a mirror image on your cookies (or fondant).


Roll your dough out onto a well-floured board til it is 1cm thick. Dust generously. Cut out heart shapes with the cutter but leave in their cavities. The surrounding dough will support the shape when a message is punched into it.


Stamp messages one line at a time. I found it easiest to line my two index fingers up with the extremities of the message to make sure they were centralised on each cookie. Use a long spatula to transfer cookies easliy to a lined baking tray.

Another hint is if you do your batches in a logical order, you wont need to wash your bowl or mixing blade or spatula in between colours!! I recommend starting with 1.Yellow 2.Tangerine 3.Pink 4.Purple 5.Ice Blue 6.Bright Green.


Here are the individual combinations I made - there are some AMAZING flavours available!


THAT SMILE - Ice Blue colour Progel with Lemonade flavour LorAnn Oil


4 EVA - Tangerine colour Progel with Mango flavour LorAnn Oil


TWEET ME - Yellow colour Progel with Banana Creme flavour LorAnn Oil


YOU ROCK - Pink colour Progel with Cotton Candy flavour LorAnn Oil


LETS KISS - Bright Green colour Progel with Pistachio flavour LorAnn Oil (Kiwicakes girls fav!)


YES DEAR - Purple colour Progel with Pomegranate flavour LorAnn Oil


These lovely treats are perfect paired with flavoured milk. Ours is presented in a cute glass milk bottle with a matching retro pink paper straw.


You can go crazy with the messages you personalise! My advice is to keep them short and sweet. Here are some other ideas...

CUTE STUFF - IM IN LOVE - FRIEND FOREVER - CALL ME - DREAM - HOPE - PEACE - MY  MAN - WRITE ME - HI LOVE - ANGEL - CUTIE PIE - MY WIFE - MARRY ME - ITS LOVE - CALL HOME - BE TRUE - HOME SICK - SMILE - THANK YOU - TRUE LOVE - YOU & ME - UR A TIGER - ONE KISS - DARLING - FIRST KISS - PUPPY LOVE - DARLING - BE MINE - ONLY YOU - LOVE LETTER - CUTE - HINT HINT - FOR EVER - HUG ME - LOVE BIRD - MAGIC - DARLING - LOVE IS SWEET - CUP CAKE - DARE YA - LOVER BOY - SWEET TALK - I WONDER - SWING TIME - TWO HEARTS - SOUL MATE - FRIEND ME - TEXT ME - XOXO - CRAZY 4 U - EMAIL ME - IM YOURS - FRIENDS - BFF - TRUE LOVE. 
Related Posts Plugin for WordPress, Blogger...