Tuesday, August 30, 2011

I just love it when the children can teach me a trick or two


I was inspired to write this post after eating the amazing lemon freeze my 8 year old made with her daddy over the weekend. We had to wait a full day for it to freeze.
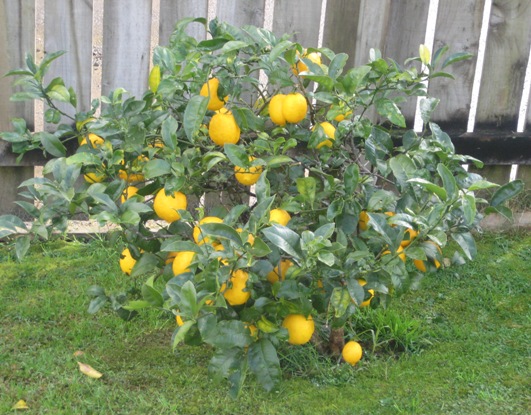
Poppy kept commenting on how burdened our poor wee lemon tree was and how she thought we needed to make something with the lemons. She found a recipe for "Lemon Freeze" in her book titled "Grow your own tree hugger - 101 activities to teach your child how to live green" (something we've been trying to do more & more).
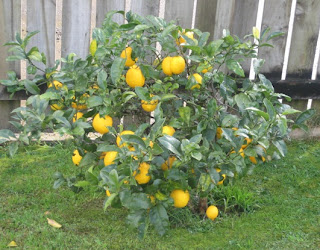

The photo above is after a large bunch of lemons were removed for this recipe, the poor tree is not quite a metre tall.
Whilst her younger brother was off at a birthday party they set about following the recipe, I was out at the time, but came home to the most heavenly smells of lemons premeating my kitchen which hung around all day.

When we ate one, I must have raved a little too much when I was told "Mum - you don't have to keep going on about how beautiful it is", to which I replied "if you put this on a menu at a restaurant you'd be famous.
No seriously, I'm not kidding it was that good. If you have too many lemons at your home, give it a try.

Lemon Freeze (serves 12)
8 lemons (there are 2 extra in case of damage to shells used as serving bowls)
720ml cream
1/2 cup lemon juice
1 1/4 cups sugar
3 tbsp lemon zest

1. Cut all lemons in half and juice them
2. Scoop out remianing pulp from the lemon halves carefully avoiding make a hole in the bottom.
3. Level off the bottom of any lemon half that tilts too much to hold liquid.
4. using the two extra halves that are most imperfect grate lemon zest in to a large mixing bowl.
5. Add cream, lemon juice, sugar.
6. Set lemon halves in a baking dish that will fit in freezer.
7. pour heavy cream mixture in to each lemon half, fill to brim
8. Freeze overnight & up to one month.
9. Serve frozen

(Tree hugger chat point - if the lemon freeze is served with just a spoon, the whole fruit serves a purpose & some dishwater & soap is saved along the way.)

Enjoy!
-->

Tuesday, August 16, 2011

Northern Advocate newspaper article Monday 15th August


Yesterday I was featured in a story on the front page of the Northern Advocate newspaper. Mike Dinsdale did a great job with the article. For the full story click here (photo Michael Cunningham)

Sunday, August 7, 2011

Her Magazine bloom awards coverage


I was looking forward to receiving my latest copy of Her magazine, to read all about the coverage of the bloom awards (for which I was a finalist for best use of technology). The magazine gave some wonderful coverage to the 2 day conference, as well as the awards. As a finalist, I received a lovely glossy 1/2 page ad.


However I was floored as I was flicking through to find I'd made the websites to watch column,as I did not know I was going to be featured there. I think the Kiwicakes website looks mighty fine in print.


Thursday, July 28, 2011

I'm a big boy now!

It is with mixed emotion for me, that my youngest turned 5 recently. When my first child was born, I couldn't wait for her to reach each new milestone, with my youngest I now think "oh that's the last time we'll ever go to kindy". As I was driving to work the day before my son's last day of kindy, I was thinking to myself about the play-doh birthday cake I received when I turned 5 at Kamo Kindy, and lo &; behold when I got to work Grandma Kiwicakes had propped this photo up against my computer.

`
The photo above lead me to thinking about my 5th birthday cake, I can still remember the anticipation of waiting for Mum to go and collect the cake. I had chosen it from the Kamo Home Cookery. They always had a few dummy dolly varden cakes in the window, which I used to gaze at longingly as we walked past the window on the way to kindy, they also had stacks of photos of them in their cake albums, mine was pink & white and very girlie. Some where is a much better photo of it, but this is the only one I could find. In 30 years, not much has changed, this style of cake hasn't changed, except perhaps the 1980s hair do on the doll and the style of piping on the dress.


However I cannot dwell on it for too long as mister 5 is so full of life and rip roaring ready to go to school, I cannot be sad for more than 2 minutes. We've already been shopping for school uniforms, books and a new bag. So we're eagerly awaiting Monday morning.


Both my husband Vaughan and I went for the "happy happy last day" at Kindy, the children get to choose their mat time activity/song and receive a card & play-doh cake. Mister 5 chose dinosaur cupcakes to give to his friends, as he lives, breathes and dreams about dinosaurs, all day every day!


So it was not surprising the party theme was DINOSAURS! I used the Diggin for dino partyware
-->


Mister 5 had very specific ideas about the candy he wanted in the jars on his party table I used green & orange jelly beans from Kiwi candy buffets the kids really enjoyed using the tongs and scoops to get the candy from the old fashioned candy jars


If it could be made in the shape of a dinosaur it was, such as the sandwhiches, which I cut out using these cookie cutters These dinosaur picks were perfect for spearing cheese & dinosaur eggs, oh I mean grapes!


I made the mistake of telling Mister almost 5 to look through all of my cake books and see what he liked for a cake, he found an old wilton yearbook from the 1980s and chose the Wilton Megasaurus cake tin, long discontinued, so it was an expensive shopping trip on ebay to get the tin secondhand.


For some reason I've never been a great fan of poking candles right in a cake (unless it's round and plain), so I was really pleased to find this Wish-a-saurus candle holder, which makes a great keepsake of the party when all the excitement is over.
That's it for kiddy birthday parties in our house until next. Goodness knows what next years obsession will be?

Monday, July 11, 2011

My time in Wellington


Many of you have enquired how my time in Wellington went, at the Her magazine Businesswoman of the year awards, I've had this blog post part written for a short time and hadn't quite finished until now. Many of you know I returned from Wellington to an email crash of epic proprotions, the ripple effect of this meant chaos for some time. But on to the story............

I reached Wellington late in the afternoon of Wednesday 29th and took a taxi to the James Cook Chancellor hotel (very nice). I checked in with the lovely folks from Her magazine . Then it was quickly up to my room to change in to a frock, in time to meet my lovely date for the night. Many thanks for Fiona Hume for agreeing to accompany me. You might remember Fiona's last cake see here or her winning entry in 2010 see here and here Fiona and I had a blast and we talked cakes much of the time.

The awards were part of a lovely dinner hosted by Her magazine. Kay Gregory was our MC for the evening. When it came time to announce the category I was nominated for Kay read out the spiel about me, that had been pre-prepared for her, she then when on to say she could vouch for how great my website was, as she was a customer and received my newsletters, this was totally unexpected and made me quite proud.

I did not win my category, the honour went to Cilla Hegarty from NZ Tax Refunds. Cilla also won the supreme award across all categories. But I'm certainly thrilled to have been nominated.


I met the lovely girls from Biteme Cupcakes Caroline & Rachael this is a photo of them from their website they were nominated for the best new business category. It was lovely to have another nomination from the cake industry. We also talked a lot about cakes. They promised to send me some cupcakes, to test how they travel on the courier (I wonder if they will remember?)

After a fun filled evening, I climbed in to bed at 1.30am and left a large group of ladies still enjoying the wee small hours of the morning.


Thursday morning, I had arranged to have breakfast with the lovely Tanya of Decorada We also talked a lot about cakes & cookies. I was so lucky, to receive a gorgeous box of Trixie kiwi cookies (that's the Kiwicakes logo for those of you that don't recognise it). I would also not be exaggerating when I said, they were one of the very best sugar cookies I have ever tasted. Don't you just love Tanya's wonderful pale blue satin ribbon printed with her logo.

My time in Wellington was short lived less than 24 hours later I was back in Whangarei - one tired caker!

Starship's Diamond & Stars Tea Party

I received an email recently from one of Kiwicakes earliest customers. Lenna has been with me right from the beginning. She asked me to sponsor some Satin Ice fondant, glitter and some foil cupcake cases for Starship's Diamond & Stars Tea Party. The event raised over $88 000 for Starship's national air ambulance. Lenna sent me some wonderful photo's of all her hard work (she had an accomplice in the lovely Donna) She also promised to send some photo's I could share with you all and I just loved what they did with their 350 cupcakes. I think they did an awesome job.

I asked Lenna what she thought of Satin Ice fondant and she said "Donna and I had a lot of fun making these cupcakes for such a great cause.We loved the Satin Ice Fondant, it was easy to use and tastes AMAZING! Love love love it!"

Enjoy the photos


Tuesday, July 5, 2011

Satin ice fondant colour mixing chart

Click to enlarge & print this awesome colour mixing chart for Satin ice fondant. Make a huge range of awesome colours from the standard Satin ice range.


Monday, June 27, 2011

How I colour my paua shells


I frequently get asked how I colour my paua shells (made using the paua shell moulds specially commissioned by Kiwicakes), after having explained it at length many times, I thought a photo tutorial might be quicker. If you need to know how to use a silicone mould see here
--> . The photos above have white hologram glitter on top of brown sugar, to look like twinkling sand on a hot sunny day.


My paua shells above I made using Dark Chocolate Satin Ice Fondant (you can use any colour, although colours don't show up well on white, or you can use melted chocolate and wait for it to set.) I greased my moulds with crsico, so I wouldn't have cornflour to dust off the dark colour fondant, this gives them a nice shine too.
I start with at least 5 colours of lustre, 1 blue, 1 green, 1 pink, 1 purple and the essential secret to making them come alive 1 gold (I often use more colours, but 5 is the minimum)


I line my paua up, open any colour of lustre and cover all of the pauas in random splats of that colour.


I repeat this process until of the paua are completely covered in splats of colour. At this stage, they look ridiculous.


Taking a large brush, sweep all of the dust off in one direction only, this blends the paua colours in one quick swift motion. I find the paper towel works well to stop excess floating around.


They are so quick and easy to make for cupcakes or cakes


They look good placed among other seashells & corals


And when required, even look good in paler tones, to match other colourways

Tuesday, June 7, 2011

Her magazine profile

What a surprise I got today when I opened up my latest Her Magazine and found myself profiled towards the back of the magazine. And I'm in good company for this issue, there's an article on cakes which features cakes from BJ's, Custom cake designs, City Cake Co, Iced & Rosebowl. Over the page is a great article on the lovely ladies from Bite me Cupcakes. There's even a lovely ad for Annah Stretton featuring loads of CUPCAKES! Great to see all things cake getting such good coverage in a magazine devoted to fashion & business.

Monday, June 6, 2011

A quick and easy fern leaf using the FMM cutter

This quick how to make a fern leaf, using the FMM fern leaf cutter came about, because a customer is having trouble with the fern cutter. I thought some of my other beginners might enjoy it too. I am not an overly experienced flower & leaf maker. In fact there are many in NZ that specialise in teaching this art and I'm not one of them. This "how to" is merely meant to convey the steps required to create a leaf for those who aren't familiar with how it is done.


-->  using  green gel paste I rolled it out very thin and created a thicker vein up the middle of the paste. This can be done using a grooved rolling board, or by simply rolling from the centre outwards, first from one side, then the other, leaving a vein in the centre, that you never roll over.


If your paste is thin enough, the item you've cut should stay right there on the board. My first cut left a little paste in the gaps, I just flicked it out with my scribe. If you're worried your paste will stick to the cutter, you can over hang the bottom end of the cutters fern stem 2mm past the bottom edge of the paste, this allows you to pop your scribe in to the gap and flick your stem out of the cutter, this works well as it is the thickest part. In my case, this was not necessary, but can often be helpful if your paste is a bit hot or sticky.


Using a ball or dog bone tool on a foam pad, soften the cut edge of the fronds, to take away the sharpness of the cut.
I heated my wire in a flame and inserted it in to the thicker stem of the fern at this stage, as I wanted the wire to adhere immediately, so I could move forward with photographing the steps.


Once your fern has dried you can dust it with dusting powders or lustre, to give it's finished colour. And wire in to your finished floral spray.

Wednesday, June 1, 2011

How to use a silicone mould


This short tutorial shows how to use a silicone mould. I am using a silver fern mould, but the principles are the same, no matter what shape your mould.


The first step is to make a size guide for your fondant icing, that you will use to fill the mould. After some practice you can skip this step, as with time, you begin to be able to eyeball the amount of fondant required. It is much quicker to use the correct amount of fondant to fill the mould, than to try to trim it afterwards.


Quickly press down in to mould, to see if the amount you have is too little or too much.


Once you have the correct amount of fondant for your mould, roughly shape it in your fingers to the shape of the mould


Then dust the fondant (not the mould) with a little corn starch, potato flour or icing sugar.


Press to fill the mould, you only need press gently. If your icing if very soft & squishy, it may stick. If it does, it is far quicker to start again, thean to mess about trying to unstick it. knead a little corn starch or icing sugar in to your fondant if it is very hot & sticky.


To release the shape from the mould, turn over on to a work surface or the palm of your hand, and peel from one end, moving along the length of the fern. The finished shape may show some cornflour on it, this can be brushed off when the shape is dry, or you can use a little clear alcohol on a brush (NOT WATER!)


However if you wish to cover in lustre, such as I have here (I've used starlight comet white) there's no need to even worry about brushing the cornflour off, as you'll never see it.

Our full range of silcione moulds can be used with fondant icing, melted chocolate or gumpaste. I mostly use fondant, as it's works best on cupcakes & cakes. If oyu need the item to stand up and set hard, then you need to use gumpaste or add a hardener such as tylose or gum trag to your fondant.
If you use chocolate, it will have a matte finish, as the interior of the silicone moulds is not polished. However for items such as the paua shell this doesn't matter, as the entire surface is covered with lustre.
Related Posts Plugin for WordPress, Blogger...