Sunday, July 26, 2009

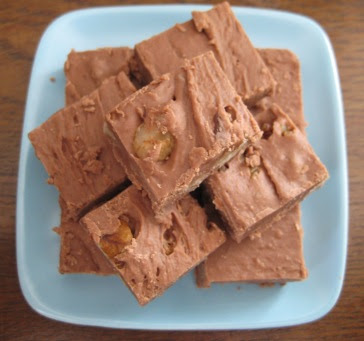
Fudge using Marshmallow

I'd always wanted to try making fudge the American way, with Marshamllow fluff. My dear friend Kat (from Whangarei cake tin hire) also wanted to try it, so I sent her home with a jar of Marshamllow fluff and a bag of chocolate. The result was delicious.
For those of you that want to try it yourself.

What You Need3 cups sugar
170g butter or margarine
1 small can (5 oz.) evaporated milk (about 2/3 cup) (Do not use sweetened condensed milk.)
360g dark chocolate (can use cooking chocolate)
1 jar (7 oz.) JET-PUFFED Marshmallow Creme
1 cup chopped Walnuts
1 tsp. vanilla

Make It
LINE 9-inch square pan with foil, with ends of foil extending over sides of pan; set aside. Place sugar, butter and evaporated milk in large heavy saucepan. Bring to full rolling boil on medium heat, stirring constantly. Boil 4 min. stirring constantly to prevent scorching. Remove from heat.
ADD chocolate and marshmallow creme; stir until completely melted. Add walnuts and vanilla; mix well.
POUR immediately into prepared pan; spread to form even layer in pan. Let stand at room temperature 4 hours or until completely cooled; cut into 1-inch squares. Store in tightly covered container at room temperature.

New member of staff at Kiwicakes


Here's our newest member of staff at Kiwicakes - Bilbo! he's 8 weeks old and my children love him to bits. I don't think he'll be much use for packing parcels, as I don't think I could trust him with them.

Friday, July 24, 2009

Kiwicakes now has wholesale arm

Well today, I am able to announce an exciting development. Kiwicakes has been appointed the sole NZ distributor for Rainbow dust products. The good news is, we can now offer Wholesale pricing, to retail businesses for resale, registered companies, bakeries, teaching institutions and licensed kitchens.

We have the entire range of 70 non toxic glitters, 39 COMPLETELY edible petal dusts from the plain & simple range and more than 30 COMPLETELY edible lustre dusts in stock. As well as the popular COMPLETELY edible gold stars and pink hearts.
The entire range can viewed at http://www.rainbowdust.co.uk/ Rainbow dusts website is user friendly and for those of you selling online, there is a full catalogue of colour images, you can use to promote the product.

It is our intention, to be able to process all orders immediately, with no back-ordering, but if due to high demand, we are temporarily out of a product, we will endeavour to dispatch with minimum waiting times.

We have a Minimum order value of $150 and payment is required prior to dispatch. Freight is flat rate of $7.50, regardless of order size.

If you would like wholesale pricing information, please feel free to email me with your business details on sandra@kiwicakes.co.nz or phone 0210770600. Please also feel free to contact me, if you require any additional information.

Tuesday, July 21, 2009

Cool new cookie cutter


This is my new favourite thing for the week. An NZ map 14cm stainless steel. Only 9.95. Also comes as a twin pack with 10.5cm Kiwi for $14.50

Sunday, July 19, 2009

SPCA Cupcake day August 31st 2009


We all know what a great job the SPCA does looking after the unloved & mistreated animals in New Zealand, but what many do not know, is this organisation is NOT government funded. I have always donated to the SPCA appeals, but when I saw the "SPCA Cupcake day" I couldn't wait to get involved.

I will be producing animal themed cupcakes for the SPCA cupcake day August 31st 2009, they will be available for $2 each. For everyone that purchases a cupcake - Kiwicakes will match the $2 purchase price. Check out the details at http://www.spcacupcakeday.co.nz/ So if you're in Whangarei on August 31st and would like to collect a cupcake, let me know ahead of time and I'll be sure to bake one just for you.

But wait THERE'S MORE! Place an order with Kiwicakes and let me know some of the items are being used for the SPCA Cupcake day and I'll include some freebies in your parcel, which will hopefully help with your creations (no false requests for freebies please, you need to be registered for the SPCA cupcake day to receive freebies with your order.)
You can further help, by purchasing cupcake branded merchandise from the SPCA. I've ordered my cupcake tea towels and can't wait for them to arrive.

Tuesday, July 7, 2009

Colour Wheel Chart


PRIMARY COLOURS

Red, Yellow, & Blue which are located in the centre of the wheel. All other colours are made from these.


SECONDARY COLOURS

Are located in the inner ring. Orange, Green, Violet, are made by mixing equal amounts of primary colours. Red + Yellow = Orange, Red + Blue = Violet, Blue + Yellow = Green


TERTIARY COLOURS

Located in the outer ring. These colours are made by mixing one primary colour with one secondary colour.
Red + Orange = Red orange, Orange + Yellow = Orange yellow, Yellow + Green = Chartreuse, Green + Blue = Aquamarine, Blue + Violet = Indigo & Violet + Red = Violet red

Colour mixing guide from Chefmaster

CHEFMASTER® PRODUCTS Food Coloring Manufacturer Guide

Apricot – 2 parts Orange & 1 part Egg Yellow
Maroon – 4 parts Red Red & 2 parts BurgundyRaspberry – 3 parts Bakers Rose & 1 part Christmas Red
Aqua – 5 parts Sky Blue & 1 part Leaf Green
Ivory – 1 Liquid Whitener & a touch of Brown and Egg Yellow
Ruby Red – 1 part Holiday Red and a touch of Black
Avocado – 4 parts Lemon Yellow & 1 part Leaf Green and a touch of Black
Jade – 1 Leaf Green & 1 Royal Blue & a touch of Black
Rust – 8 parts orange & 2 parts Red Red & 1 part brown
Burgundy – 5 parts Bakers Rose & 1 part Violet
Lavender – 5 parts pink & 1 part Violet
Sea Gold- 2 parts Sky Blue & 1 part Leaf Green
Chartreuse – 2 parts Lemon Yellow & 1 Leaf Green
Marigold – 3 parts Lemon Yellow & 1 part orange
Silver – 1 part Black and 1 part Blue
Copper – 1 part Egg Yellow & 1 part Brown & 1 Christmas Red
Melon – 1 part Orange & 3 parts Bakers Rose
Skin tone – 12 parts orange & 4 parts Bakers Rose & 1 part Royal Blue
Coral – 3 parts Rose Pink & 2 parts Lemon Yellow
Moss Green – 2 parts Violet & 3 parts Lemon Yellow
Teal – 9 parts Sky Blue & 1/2 part Lemon Yellow
Dusty Rose – 2 parts Christmas Red & 1 part Malt Brown
Navy Blue – 1 part Sky Blue & 1 part Violet
Turquoise – 6 parts Sky Blue & 1 part Lemon Yellow
Gold – 10 parts Lemon Yellow & 3 parts Orange & 1 part Christmas Red
Persimmon – 1 part Orange & 1 part Bakers
RoseWine – 3 parts Holiday Red & 2 parts Rose
PinkPlum – 1 part Violet & a touch of Christmas Red
Grape – 1 part Sky Blue & 6 parts Bakers Rose
Misty Green – 2parts Leaf Green & 1 part of Royal Blue & a touch of Black
Note: Blend the colors before adding them to the icing. Add the blended color to the icing to get the shade desired.

Saturday, July 4, 2009

Wilton's Halal certificate


One of my lovely customers Sakinah sent me details of Wiltons Halal certificate. She said (abridged)


"While I was surfing the blogs, I found something to my delight. It is a Halal Certificate for Wilton products (as listed in the certificate). For muslims like me, I would like to know what I can consume in my cakes."

Sunday, June 21, 2009

This weeks attempt at a cake


So many of you ask me what sort of cakes I do. To be totally honest, the work I do here at Kiwicakes, until very late most evenings, means I have made less cakes in the last year, than ever before. But here is a cake I made on Friday night for my daughters best friend Renee, who was turning 6. Renee was having a Dora princess party and requested a Strawberry cake (EEK that was a new one on me) it turned out great and tasted even better. Let me know what you all think.

The dress is covered in yellow glitter, which doesn't show up in the photo. I haven't taken too close a shot of the face, as my 2 year old stuck his finger in it.

Sunday, June 14, 2009

Fondant, gumpaste and icing recipes galore

Fancy making your own fondant, marzipan, gumpaste & more. The lovely people at Hawkesbaysugarcraft have published all their recipes, ont heir website. Check them out.

Monday, June 8, 2009

Kiwicakes in the news

Here's a lovely article from the "Savvy" magazine where my passion for Kiwiana was highlighted. When I first started Kiwicakes, I was amazed at the lack of New Zealand themed products on the market. My solution, to get it made myself!. Unfortunately my scanner bed is only a4, so I've had to load it in two parts - I just love what the magazine did with the photos. I made the cupcakes myself for the photo shoot. This article appeared in 2007.

Sunday, June 7, 2009

My new favourite thing! KORU


How stylish is this? I was ecstatic when my mould maker sent through the finished photo of this Koru silicone mould. This is the latest mould I will be adding to the Kiwiana range at Kiwicakes. This mould will be available from Kiwicakes only, as we are the sole NZ distributor of these moulds and this was made JUST FOR ME. It's only just come off the mould machine, but I could not wait until the stock arrived to share this photo with you. Stock of this mould should arrive in aprx 10 days. I was particulalry impressed with the ability to form a heart using 1 left & 1 right facing Koru for a wedding cake or celebration

Monday, June 1, 2009

How to ice a cake without crumbs!

Well the crumbs won't ever go away, but everyone needs a Wilton tip #789 in my opinion.

It completely seals the cake, before you smooth the icing. Check out this link to the tip in use at Wilton. The best thing is, its priced at just 10.50
http://www.wilton.com/decorating/icing/using-decorating-tip-789.cfm

How to bake cupcakes without domed tops

* To prevent domed tops on your cupcakes, tap your muffin tray, filled with batter lightly on your benchtop several times, prior to placing the tray in the oven. Alternatively stir each cupcake patty with a cocktail stick prior to placing in the oven, this helps release the air, prior to baking, thus preventing the domed top as it is cooking.
* To fill your cupcake papers, place 1 paper in each cavity of your muffin tray, fill a large piping bag with batter and pipe your batter in to the cases. It's very quick and mess free.

Sunday, May 31, 2009

2 new pallets of stock coming

For those of you that subsribe to the Kiwicakes newsletter, you would've heard me say the first time I ordered a whole pallet of stock - something along the lines of "it's not likely I'll need to order in that quantity again". WELL, I've just returned home from an overnight stay in the town of one of my suppliers and I have TWO PALLETS coming, with heaps of fantastic new stock, as well as some great vintage Wilton tins. My only concern is now, that it does not rain on delivery day. I am going to phone our local storage on Tuesday after the holiday. I think I got a wee bit carried away buying!!! and I do not have room in the stock for two more boxes, let along TWO PALLETS. These products should begin to appear on Kiwicakes towards the end of next week.

Thursday, May 28, 2009

I so love this!!!


This awesome new tool has just landed, and I have whisked one off home for me!!. Designed to hold your bags whilst you are working, the picture says it all. A great buy at $26

Tuesday, May 26, 2009

Cake Wrecks

Jen Yates of Cake Wrecks has a new book available for pre-order at Amazon. The title is titled: Cake Wrecks: When Professional Cakes Go Hilariously Wrong.
According to Jen, 80% of the material in the book is new and she has saved her “best” stuff for the book. It will be hilarious for sure.

What is a Cake Wreck? (according to Jen)
A Cake Wreck is any cake that is unintentionally sad, silly, creepy, inappropriate - you name it. A Wreck is not necessarily a poorly-made cake; it's simply one I find funny, for any of a number of reasons. Anyone who has ever smeared frosting on a baked good has made a Wreck at one time or another, so I'm not here to vilify decorators: Cake Wrecks is just about finding the funny in unexpected, sugar-filled places.

Saturday, May 23, 2009

Baking a great cake

Source http://www.wilton.com/
They say baking is a science - to get a great cake, several factors can make all the difference between mediocre & awesome!. For optimum height and texture, cake ingredients should be at room temperature prior to mixing. Eggs and butter from the refrigerator usually need about one hour to reach room temperature.

Step 1: Grease the Pan
Prepare the pan by generously greasing the inside using a pastry brush or paper towel and solid vegetable shortening. For best results, do not use butter, margarine or liquid vegetable shortening. Spread the shortening so that all indentations are covered.

Step 2: Flour the PanSprinkle about 2 Tablespoons of flour inside the pan and shake so that the flour covers all greased surfaces. Turn pan upside down and tap lightly to remove excess flour. If any uncovered spots remain, touch up with shortening and flour, or use Bake Easy™ Non-Stick Spray or Cake Release to coat the pan instead of grease and flour.

Step 3: Pour Batter & Bake
Pour batter into pan and place in pre-heated oven.

Step 4: Cool Cake
After cake has baked the specified time, remove it from the oven and let it cool in the pan on a wire rack for 10 minutes.

Step 5: Unmould Cake
Unmould from pan by placing on wire rack against cake and turning both cooling rack and pan over. Lift pan off carefully.

Greasing your cake pan

I have found two ways of greasing a cake pan, that far surpass anything I have ever tried before. One is greasing the pan with vegetable shortening, then flouring int he usual manner. The vegetable shortening, actually repels the cake batter, meaning your cake literally falls out of the pan - you believe it, utnil you see it for yourself!.


The other is a product which costs $9.50 per bottle and is simply the best thing since sliced bread! It is one of my all time favourite things. My Mum loved it so much, she bought everyone she knew a bottle for Christmas. It's called CAKE RELEASE and is made by Wilton.

No need to grease and flour your baking pan - Cake Release coats in one step. Simply spread Cake Release lightly on pan bottom and sides with a pastry brush and fill with batter. Cakes release every time, giving you the ideal surface for decorating. Now in convenient dispensing bottle. Certified Kosher. Each 8 oz. container is enough to prepare 17 pans. Especially great for use with any of the Wilton character or shaped pans.

How to bake a 3d cake

Source http://www.wilton.com/ Many of my customers have asked how it is done. SO here it is, step by step. We stock the 3d bear pan shown in the photo at http://www.kiwicakes.co.nz/

Baking a 3-D Bear Cake3-D cakes are fun for all!
All 3-D pans work best with a firm-textured cake batter (pudding added mixes and pound cakes). Do not use a traditional white cake as the crumb is too tender.
Steps:

Step 1: Prepare Pan
Preheat oven to 350°F. Generously coat the inside of both pan halves and both the inside and outside of the baking core using Wilton Cake Release or solid shortening. Be sure to cover all indentations. If using shortening, sprinkle about 2 tablespoons flour inside each pan half and shake so flour covers all greased surfaces. Turn pan halves upside down and tap lightly to remove excess flour. If any shiny spots remain, touch up with more shortening and flour to prevent cake from sticking.

Step 2: Fasten Pan with ClipsFasten pan halves together with clips, making sure the halves fit snugly together.


Step 3: Mix and Pour BatterMake cake mix according to package directions, or use your favorite scratch recipe. (Most 3-D pans require 5 1/2 - 6 1/4 cups of batter). Pound cake or a combination of pound cake and yellow or chocolate batters offer the best results. Batters that contain nuts or raisins do not work well. Place pan on cookie sheet. Pour cake batter into pan.


Step 4: Bake CakeInsert baking core into center. The batter in the pan will come right to the rim, almost to the point of overflowing. Cake fills out best when batter overflows slightly while baking. Secure core by slipping tabs of longer prongs under the sides of the pan. Pour 2/3 cup batter into core. Bake 50-60 minutes, until toothpick inserted in vent hole on top of pan comes out clean. Top half of pan may be removed during last ten minutes of baking to check cake.

Step 5: Cool Cake
When cake is done, remove from oven and place upside down on cooling rack 5-10 minutes. Remove top half of pan and cool 5 minutes more. Replace top pan, turn cake over and remove bottom pan. It may be necessary to tap pan with the handle of a spatula to free cake from pan. Cool 15-30 minutes.


Step 6: Remove Pans and CoolRemove pans; gently remove the baking core and the baked cake centre. Set cake upright and cool completely.


Step 7: Fill in Cake Center and Decorate
Place the cake center inside the bear, filling any empty areas with buttercream icing. Position cake upright on plate, and secure to plate with icing or melted candy. Your teddy bear cake is now ready to decorate!


Tips for Baking 3D or Stand Up Cakes
All 3-D pans work best with a firm-textured cake batter (pudding added mixes and pound cakes). Do not use a traditional white cake as the crumb is too tender.
Be sure pans are either greased (with vegetable shortening, not oil or butter) floured or sprayed with a vegetable spray, or brushed with Cake Release.
It is important to follow pan directions for batter amounts.
Always allow cakes to cool overnight, resting in back half of pan.
We recommend hand washing pan in hot, soapy water.

Kiwicakes 3rd birthday competition cake winner

Yesterday after much drama, the Kiwicakes 3rd birthday competition cake arrived. Tracy did a great job, and popped the cake on the courier in the Waikato on Thursday afternoon as planned. Friday morning, when our lovely courier arrived in the driveway, with just a new book for me in hand, I started to panic. After running a trace on the courier ticket, we found the cake had been "mis-sorted" to Auckland. An hour later I was told, "don't worry, the van has left Auckland and there is no Whangarei freight left in the depot", so I race to the depot at 2pm, only to find STILL NO CAKE. After some phone calls, the kind receptionist finds the go to lady for problem solving at the Auckland depot. She informs us, she has herself, not long put the cake on the passenger seat of the next van leaving for Whangarei, due in at 3.30pm. PROBLEM I am due to pick Poppy up from school at 3pm - 40 minutes away. So "Super Mum" (that's my Mum AKA Grandma) to the rescue. She picks up the cake at 3.30pm and drives it out to us at Hikurangi.

So despite the best laid plans, of having a friend available for photographing me & the cake on a lovely sunny Friday morning. I was left with failing light and poor "Super Mum" having to take the photo. I had great intentions of a lovely setup for the photo, but with a grey late afternoon, it was too dark inside and the artifical light did the cake no favours - so we opted for the cake on one of my dining chairs on the deck.

I hope you all enjoy seeing it - please feel free to use the comment section, to leave comments and ask questions.
My children Poppy & Lennox, thought it all terribly exciting, me racing around in a flap, added to their sense of drama.They each chose a candle they liked best and insisted that was the one they wanted to eat. AND YES, we did cut the cake and eat some. I tried all three flavours in quick succession - and ate TOO MUCH!
We had three lovely flavours to choose from. My favourite was the chocolate with strawberry buttercream filling. "Super Mum" liked the Citrus cake, which turned out to be lemon (because Tracy forgot she had put orange on her entry). Poppy liked the vanilla cake with cookies & cream filling.

I was impressed with Tracy's buttercream filling. After speaking to her on the telephone last night, I was able to discuss her technique. After she has mixed her buttercream, she adds melted white chocolate to the icing. Then refrigerates the cake before covering in fondant. This ensures she has a nice firm cake for covering, with no slippage or movement at the filled area. It tasted great too!. Tracy also tells me, her daughter Shayna (who helped with the original design drawing) helped her hand roll the fondant balls around the base of each tier.


Here's another look at Tracys winning entry & Tracy with her cake


Thursday, May 21, 2009

How to bake the perfect bundt cake

Kiwicakes is proud to be a supplier of Nordicware. We've got some great Nordicware pans in stock, with many more to come. Here are some great hints and tips, for how to bake the perfect bundt.
HOW-TO BAKE THE PERFECT BUNDT CAKE

Helpful Hints For Fail-Safe Results

You do not have to be a culinary expert to bake a perfect Bundt® cake or bake in any of the various Nordic Ware shaped pans. You just need the proper tools and the inside know-how! Say goodbye
to cake sticking to the sides of the pan and hello to the many “oohs” and “ahhs” you’ll get when presenting your work of art to guests or to the kids!
1. Use the proper cooking spray. Spray the Bundt® pan with a non-stick vegetable oil. We recommend a non-stick spray such as Bakers Joy* which contains flour. After spraying, take a pastry brush and brush the oil into the grooves of the pan and then turn the pan upside down on a paper towel, allowing excess oil to drain away. Avoid using spray with Lecithin listed as an ingredient as a gummy residue can build up over time. Better than using spray, brush pan with a solid vegetable shortening and dust lightly with flour. Briskly tap the pan several times with the palms of your hands to distribute the flour evenly and then turn pan upside down over a sink to remove excess flour
2. Avoid bubbles in the batter. To prevent air bubbles in the cake, slowly pour the batter in one corner of the pan and allow the batter to slowly flow in and around the Bundt® design.
Gently tap the filled cake pan on the counter a few times, this will make the air bubbles/pockets rise up and away from the outside of the cake.
3. Showcase the details using a spatula. Mixes and recipes may vary, so fill the pan about 3/4
full to avoid overflow. With a spatula, push the batter to the outside of the pan pushing
slightly up the walls; this will help the cake climb up the sides, giving you greater detail on the outside of the cake.
4. Bake and then cool for 10 minutes before inverting. Place the pan on the center rack of the oven. Black or dark colored pans require a 25-degree Fahrenheit (10°C) heat reduction from the recommended oven temperature. Bake for time indicated and cool 10 minutes – no less, no longer. With hot pads, pick up the cake pan and gently shake the pan from side to side listening for thumping. This indicates cake is loose and ready to invert. A plastic knife may be used to carefully loosen the cake around the center tube and sides if sticking persists.
5. Invert, continue cooling and dust or drizzle. Invert on plate or cooling rack; continue to cool. Dust with powdered sugar using a sifter or drizzle your favorite sauce on top. ENJOY!
*Instructions can be used with any Nordic Ware Bundt pan.
For more information about Nordic Ware visit www.nordicware.com

Wednesday, May 20, 2009

New silicone moulds just landed


I have just had the latest release moulds arrive from the UK. Don't forget Kiwicakes is the sole NZ distributor - so you won't find these anywhere else. Too many to show you here on the blog, but here are some of my favourites. Pop on over to Kiwicakes and check them all out!. The Koru hearts are sure to be popluar for wedding cupcakes. And goodness only knows what the underwear will be used for.

Tuesday, May 12, 2009

Crusting cream cheese icing recipe

For those times, when regular cream cheese icing just isn't right (wedding cakes and special occasion celebration cakes)
Ingredients
1 cup butter, softened
1/2 cup solid vegetable shortening
1 pound cream cheese, softened
1 tablespoon clear vanilla extract
3 1/2 pounds sifted icing sugar
1/2 teaspoon salt
Cream butter, shortening, cream cheese and extracts. Gradually add icing sugar and salt. Beat on low speed until nice and creamy. This recipe is for a stiff consistency. For a thinner consistency, use 3 pounds of icing sugar instead. If you want a very smooth cake, let the cake sit for 15 minutes after icing. Then smooth with fondant smoother or dough scraper or non textured paper towel.

Adding pudding to cake mix

Ok, so most of the time we all like to bake from scratch, but sometimes that isn't feasible. In which case, a doctored cake mix can be fun.
I received this recipe from JanH in the USA, and have had a lot of fun, changing the pudding (instant pudding dry mix) in the recipe for different flavours.
Ingredients
1 box of cake mix (Betty Crocker or similar)
4 whole eggs
1/3 c. water
2/3 c. of buttermilk --full fat. If you use the low fat buttermilk, use 1 c. of low fat buttermilk and omit the water (if you do not have access to buttermilk, use 2 tbsp of vinegar in regular milk, wait 5 minutes for it to curdle)1/3 c. of oil
1 package of instant pudding
For a true white cake, you can just use 6 egg whites (and not whole eggs), but I find the cake sturdier using the whole eggs.

My favourite lately has been to add pistachio instant pudding or cheesecake instant pudding to a vanilla cake mix. The resulting cake is hard to guess has its roots in a packet mix.

Like a pig in mud


Today I'm like the proverbial "Pig in mud!". Some of my all time favourite things in cake decorating are glitters & lustres and today I've had a phenomenal selection arrive, with 24 new items to the Kiwicakes range.
Most notably is the edible Gold stars and Pink red hearts. There is literally htousands in a tube, so if used sparingly the $18 tube will last a very long time.
These are definitely my new favourite thing and I've whizzed off home with a pack of each for myself.

Sunday, May 10, 2009

Does icing consistency really mater?

Yes, yes yes! - it sure does.
For years, I never knew how important it was to get my consistency right for each task. SInce making sure my icing for leaves & writing was "thin", they have never looked so good.
Icing Consistency (source www.wilton.com)

If the consistency of your icing is not right, your decorations will not be right either. Just a few drops of liquid can make a great deal of difference in your decorating results. Many factors can affect your icing consistency, such as humidity, temperature, ingredients and equipment. You may need to try using different icing consistencies when decorating to determine what works for you.
As a general guideline, if you are having trouble creating the decorations you want and you feel your icing is too thin, add a little more icing sugar; if you feel your icing is too thick, add a little more liquid.
In royal icing recipes, if adding more than 1/2 cup confectioners' sugar to thicken icing, also add 1-2 additional teaspoons of Meringue Powder.
Options

Option 1: Stiff Icing
Stiff icing is used for decorations such as flowers with upright petals, like roses, carnations and sweet peas. Stiff icing also creates your figure piping and stringwork. If icing is not stiff enough, flower petals will droop. If icing cracks when piped out, icing is probably too stiff. Add light corn syrup to icing used for stringwork to give strings greater elasticity so they will not break.

Option 2: Medium Icing
Medium icing is used for decorations such as stars, borders and flowers with flat petals. If the icing is too stiff or too thin, you will not get the uniformity that characterizes these decorations. Medium to thin icing is used for icing your cake. Add water or milk to your icing recipe to achieve the correct consistency.

Option 3: Thin Icing
Thin icing is used for decorations such as printing and writing, vines and leaves. Leaves will be pointier, vines will not break and writing will flow easily if you add 1-2 teaspoons light corn syrup to each

Sunday, May 3, 2009

Kiwicakes latest ad


My dear husband is so clever. He made this latest ad for me, to replace the last ad I had for the NZCDG magazine. Last time I gave him the text and pointed him at a royalty free photo site and asked him to make me an ad. This time I found the photo myself and came up with the phrase "have you heard the news", but he took my idea and made it 10x better than I possibly ever could. There are certainly merits to marrying an artist & art teacher. Mum joked he should quit his job and go work for an ad agency. I think I'll run with this ad for a while, it's the best I've had yet!. We're approaching nearly 2000 different products in stock - so we really are NZ's largest online retailer of cake decorating supplies.
It would have been great to run it in colour, however I think it still looks great in black & white. Please let me know what you think of it.

Saturday, May 2, 2009

Home baking an upward trend

(Source Squires Kitchen Sugarcraft Trader May 2009)
A new trend is sweeping the nation – Caking. The art of baking cakes at home is enjoying a massive revival with 85% of Brits stating that they have baked cakes at home and nearly a third (29%) of British Bakers saying they are baking more than ever before. The research, commissioned by baking expert Dr. Oetker to explore the role of baking in modern life, reveals that nearly two thirds (64 per cent) of Brits bake cakes more than just for Christmas and Easter,
with a quarter (25 per cent) getting creative more than once a month. And just like the recent knitting revival, the Caking revolution is being led by the UK’s youth – 70 per cent of under 25s are baking regularly. A third (29 per cent) of the nation feels the recession has had a direct impact on their baking habits, with 52 per cent refusing to spend money on something they can make at home. Baking is becoming increasingly important (40 per cent) as a family activity, and dads are getting stuck in, with a third of men (33 per cent) now baking cakes as an educational activity to share and enjoy with kids.

Revolution in cake-making led by under 25s
Other key findings:
• 19 per cent of Brits are inspired by celebrity chefs to get Caking
• 37 per cent of men take up Caking for relaxation compared to 32 per cent of women
• 33 per cent see Caking as a creative outlet
• One in 10 (11 per cent) of Brits whip up a cake to impress dinner guests.

Friday, May 1, 2009

Kiwicakes 3rd birthday competition now closed!

The Kiwicakes 3rd birthday competition is now closed . What fun it's been! Here are the entries I received. Please feel free to add your comments, suggestions & questions. I'm sure the entrants would love to receive your feedback.
And the winner is Tracy Unsworth with her tiered creation above. Tracy fulfilled many of the competition criteria including "a cake that epitomises Kiwicakes". She used icing colours that matched the Kiwicakes website and fulfilled a secret wish of mine to use unusual cake & filling flavours. Tracy receives a $500 cake decorating supplies prize as well as having her costs covered for making the cake. I had the pleasure of delivering the good news to Tracy this afternoon. Tracy tells me her 15yr old helped her with the design and tells me "I threw ideas off her and she was very beneficial indeed". Tracy will be making the cake mid May and I will update you all with photos of the cake when it arrives.

As promised here are the entries I received, (in no particular order). I can honestly say I loved every one of them. I would have enjoyed every cake if it was the winner, but sadly there could be only ONE winner.


Related Posts Plugin for WordPress, Blogger...