Monday, July 21, 2014

Frozen Snowflakes & Melted Snowman - from Kiwicakes test kitchen


These winter wonderland treats are right on trend and are particularly fitting for these chilly winter days we are experiencing. So much for living in the winterless north!

To achieve todays yummy crafts I cracked into some modelling chocolate, which tastes divine as well as having great stick-ability and moulding qualities.


This snowflake was handcrafted out of light blue modelling chocolate made with 1 part blue plus 4 parts white. It was rolled 4mm thick and snipped into shape with kitchen scissors then dusted with sapphire edible glitter


Although these look like cake pops we actually cheated and used ferrero rocher chocolates for the centres. It's an easy no-bake solution. Just unwrap, stab the ball with a cake pop stick then wrap with a circle of white Chocit. The red round cutter from this cookie cutter circle set is the perfect amount to mould into position. Just use clean dry hands to roll into a smooth ball. It seals the ferrero rocher in and adheres to the stick without any need for edible glue. Then the coated ball can be dusted with white edible glitter for some texture and shine.


Decorations like the blue snowflake stick magically when you press it gently onto the ball and they easily hold their shape! This is also true for the snowman decorations like his arms and all facial features. My snowman's hair is the only part that does not self-support for very long so he might need a quick hair touch up before serving. His nose is made from a wee bit of orange Chocit and it too sits proudly without wilting, I just used the end of a paintbrush to make a divet to press the carrot nose into. His arms, hair and other features are made using a little Brown Chocit rolled thinly and cut into strips. Rainbow packs are a great way to start your modelling chocolate collection. 


To make the melted snowman cookies, roll out your favourite cookie dough and make snowflake cut-outs to bake.This is a really effective shape! When cooled, top each biscuit with a rolled round of chocit, press into place and trim the base. 


Then gather his edible accessories, stack on top and smush into place to resemble the effect of melting!  


A snowflake also looks good in light blue or turquoise with a basic shape etched on top. This is where your flower modelling tools come in handy.


Finally the magic is completed with some edible glitter on the edges...


Tuesday, July 15, 2014

Eiffel Tower Cookies - from Kiwicakes test kitchen


These perfectly Parisian cookies can now be made in the comfort of your own home! Your two secret weapons are the delicate Eiffel Tower cookie cutter and the striking wafer paper edible sheet of eiffel towers, which specifically fit our cookie cutter.


Use the cutter to shape your favourite rolled out cookie dough and bake. When cool, paint with a little sugar glue to make the top surface tacky. Use the cutter again, this time on 2-3mm thick rolled white fondant (with a pinch of tylose worked in) and transfer a shape to the top of each biscuit. I used the middle notches as a placement guide and then eased the fondant on gently.


Cut around the wafer paper prints with fine kitchen scissors. This step can be done in advance and remember that care taken with cutting will show in your final product. Use your sugar glue again (really sparingly) to moisten the top of the white fondant and lay the print on top, pressing to adhere.

These cookies just fit into a favour bag and look great with our styling tags which also come in green, red, pink and blue. Use them to personalise cookies with the theme or individual names.


These cookies can also be showcased vertically for impact! The golden cookie dough we used looks great on this gold cake board. 


The four sides of the tower are cemented together with a touch of royal icing (recipe available in an earlier blog here). I love how you can see through this tower like you can through the real thing!


This structure would also work as an impressive cake topper for french themed occasion. 

Wednesday, July 9, 2014

Peacock cookies - quick and easy with Rainbow Dust lustres


We recently showcased these cookies at the Cake Expo here in Auckland this weekend passed. These rich & lustrous cookies were made with the tools shown below and Rainbow Dust edible lustres & metallic edible paints. We baked a simple sugar cookie recipe using the Autumn Carpenter autumn carpenter peacock set . Once cooled we attached Satin ice chocolate fondant that had been embossed with Autumn Carpenter peacock impression mat set using edible glue from Rainbow Dust.


To decorate I started with the eye of the feather, dusting a little gold lustre, followed by either of the two blue metallic paints - midnight blue or royal blue (As I did a number of cookies, I used different blues on different cookies). Using a large fluffy brush I alternated brushing the cookies with irridescent lilac fusion, irrisdescent green fusion, starlight comet green and blue shimmer lustre dusts. Once the cookies were completely covered in lustre dust, I took one large brush and in a single sweeping motion blended the colours together. This merged the eye of the feather with the lustred area. 
Rainbow Dust lustres come in a wide variety of colours, that represent well metallic colours of everyday items we try to replicate in cake and cookie form such as as metal, feathers, nail polish, eyeshadow, jewellery and much more. At Kiwicakes we stock every colour in the range - see here 

Monday, July 7, 2014

Awareness Ribbon Cookies - from Kiwicakes test kitchen

Many charities in New Zealand now identify with a specific colour ribbon to generate awareness and support for their cause. With an awareness ribbon cutter you can easily make coloured fondant cookies for charities you support throughout the year. Here are a couple of the well-known ones...

Breast cancer = Pink ribbon
Violence towards women = White ribbon
Epilepsy = Purple ribbon
Child poverty = Blue ribbon


This cookie has been overlaid with appropriately coloured fondant. It has been embossed with a floral texture mat from this set, shaped with the same ribbon cutter used for the cookies, stuck on with sugar glue, sprinkled with non-toxic hologram glitter and bagged with a ribbon tightly for freshness.

These are quick to make en mass and can be made ahead of time and frozen all ready-to-go.

With the same cutter you can make fish shapes by adding a candy eye to the side and suggesting gills by using 3 moon-like impressions from a scallop & comb tool. Its tail can be finished with markings from the comb end.

Thursday, June 12, 2014

Kiwicakes 8th birthday competition winner - Paula Andrew


Today I'm pleased to announce the winner of the Kiwicakes birthday cake is Paula Andrew. Paula submitted the sketch above. A Minecraft theme with pixelated social media icons on 4 stacked cakes with a pixelated Trixie standing on top. The cakes are approx 3,4,5 & 6'' cubes. Raspberry lemonade flavour YUM!. And even better news I've arranged with Paula to have the cake made for the Cake Expo in Auckland July 4,5&6 2014. So if you're coming along, you'll be able to see the cake up close & personal.

In no particular order here are the other entries that were submitted for the competition.


Wednesday, June 11, 2014

Chocolate Buttons - quick & easy


These super cute chocolate buttons are quick to make as party favours. These use very little chocolate, so are quite economical too.

I used pre coloured Candy melts and this chocolate button mould. I printed a little "chocolate buttons" bag topper and sealed it using our Cake pop bags.

Moulding the candy melts or coloured chocolate is easy. Simply melt over a double boiler. Tap to remove air bubbles. Then chill for 1 min in freezer or 2 min in fridge then tap out. As they fall on the bench they sound like real buttons wobbling down. 


The mould has very thin cavities, so rather than filling each cavity, I simply poured some chocolate over the mould and spread it with a spatula.


They really look like real buttons - and I can't help but smile when I see them.


Wednesday, May 21, 2014

Sweet Cream Cheese Button Cookies


Cream Cheese Button Cookies 

Ingredients
100g butter softened
100g cream cheese softened
1C white sugar
1 egg
1 tsp vanilla
3 C flour
1 tsp baking powder
gel food colourings

In a bowl cream butter, cream cheese and sugar until fluffy. Add egg and vanilla, mix until smooth.
Add dry ingredients to the creamed mixture. Divide dough in to your required number of colours and tint each batch of dough with colour of your choice (it must be gel paste colourings). 

Chill dough in fridge at least 2 hours. The dough become soft quickly. I rolled my dough out on cook-a sheets and cut chilled dough in to buttons, using 2  round circle cutters. use the next size down circle to imprint the round indentation. I used a tip 3 piping nozzle to imprint the button holes. 

Preheat oven 180C. Bake 10 minutes. Chill completed cookie designs for 5-10 mins before baking. This helps to ensure the cookies don't spread.

I printed the cards on the top of my cookie bags, using this wonderful free printable from the lovely ladies at  On To Baby blog. You can change the colours to suit your own theme and there's other great free button printables for party invites, table cards &  much more. The bags are our size 2 cello bags

Monday, May 19, 2014

Sparkly Tiara Treats - from Kiwicakes test kitchen


Today in the kitchen I used our tiara cookie cutter to showcase our new silver dragee range and produced these adorable crowns fit for a princess.


There are a dozen new shapes in our range including the tear drop, marquis and rice dragees pictured above.


To make these treats I used the same cutter for both the cookie dough and the pink fondant. Once my cookies were baked and cooled, I brushed a little sugar glue on and eased fondant tiara shapes over.


To stick the bigger dragees securely to the iced cookies I used a fondant cement. To make one is simple! Inside a disposable piping bag add a small lump of the coloured fondant you are using and a few drips of water. Microwave it for 5 seconds then massage the liquid into the fondant to create a paste. Snip off the end and pipe blobs where the big dragees will sit. If this  hardens inside the piping bag while you are working then pop it back in to heat up for a couple of seconds again. Smaller decorations can be stuck on using the tiniest dab of sugar glue.


Let the peaks of the crown determine the placement of your decorations or freestyle it like I did. Lastly highlight the cookies with a shimmery lustre dust to give them some magic!

Friday, May 9, 2014

Poppy's marvellous creations


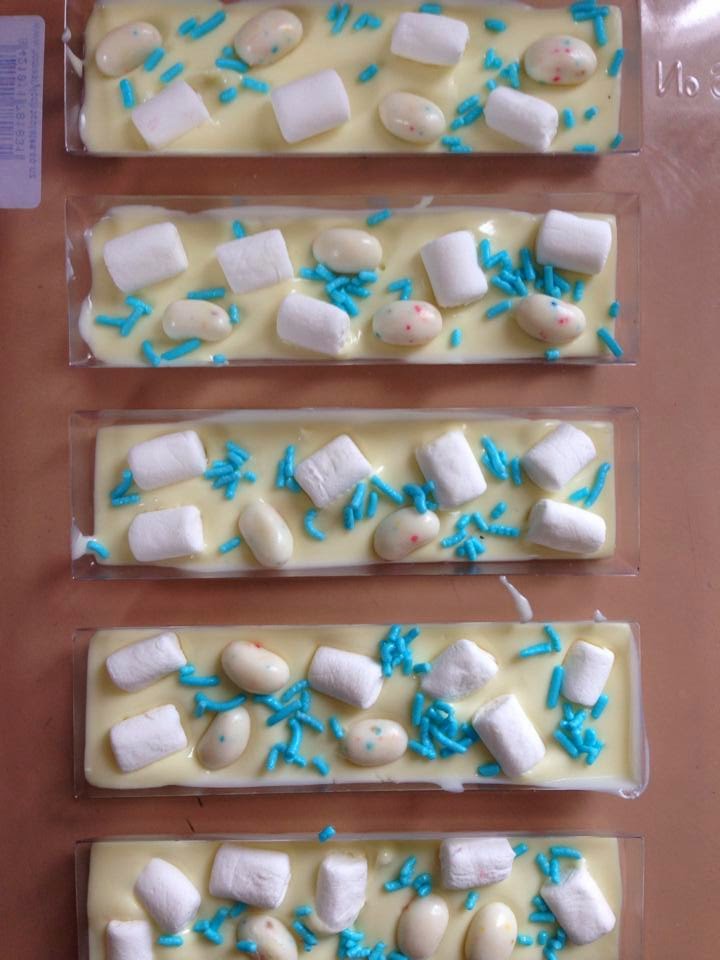
My daughter poppy recently created her own "Poppy's marvellous creations" chocolate bars in preparation for her Willy Wonka themed birthday party


Poppy started with a simple bar mould, that mimics the shape of a store bought chocolate bar. Along with a mixed pack of wrapping foil.

Poppy raided the Kiwicakes test kitchen for candy, pop rocks, chocolate & other tasty additions. In planning her chocolate bars, she somewhat themed them to her foil colours.  


Pink foil: Strawberry pop rocks, strawberry daquiri jelly beans, freeze dried strawberry slices in white chocolate


Green foil: Watermelon pop rocks, lime jelly beans in milk chocolate


Orange foil: Orange jelly beans, orange marshmallows, cornflakes, chopped peanuts in dark chocolate


Dark pink foil: Raspberry flavoured M&Ms, pink marshmallows, hundreds & thousands  in "Limited edition raspberry flavoured" candy melts by Wilton


Blue foil: "birthday cake" flavour jelly beans, white marshamllows, blue sugar pearls in white chocolate.

The jelly beans we used were all Jelly Belly brand, hence the more unusual flavours

The wrappers were printed on gold paper, left over from her  "Golden ticket" party invites.

Her finished bars were a huge success, they looked great on her party table, and have impressed family and friends after her party (we had quite a few left over, so have been feeding them to visiting family and friends over the last week)

Tuesday, May 6, 2014

Pretty shell cake - great for birthdays and weddings


Todays fun post comes from my American friend Autumn Carpenter. Autumn designs and manufacturers a broad range of cake decorating supplies, which I'm proud to stock at Kiwicakes.

This cake would be a sure favourite with Grandma Kiwicakes, she adores shells and corals.

Tools and Ingredients
6", 9" and 12" two layer cakes
14" cake board or drum
light blue rolled fondant
ivory rolled fondant
Hawaiian Texture Sheet Set
white candy coating
milk chocolate
mop brush
8mm sugar pearls
pastry brush
flexible poly blade
pastry roller

Method
Melt chocolates separately and place in towel lined electric skillet to keep warm and fluid. To add stripes to shells, dip finger in milk chocolate and wipe finger into cavity. 
Flood cavity with white candy coating and place in freezer to set. 
Once set, remove from mould and use mop brush to brush tops of shells with lustre. 
Roll light blue fondant to desired thickness, brush board and cakes with piping gel and cover. Using mop brush, dust cake and board with pearl dust. Prepare cakes for stacking and assemble. 
Roll ivory fondant to 1/8" thickness, roll shell texture sheet over fondant making a strip long enough to go around the cake. Make a straight cut along the bottom of the strip using a pastry roller then use the flexible poly blade to cut shells so that strip is 4" high. 
Brush sides of cake with piping gel then apply shell strip. 
Repeat with each cake layer. 
Attach shells and pearls to cake using piping gel.


Monday, May 5, 2014

Mothers Day 'Borrowed' Rhubarb Treats - from Kiwicakes test kitchen


Most mums want nothing more for Mothers Day than a visit or a phone call. Or that's what they say. I reckon you'd be pretty popular if you arrived with a tray of these fruity beauties! If you don't have rhubarb planted in your own garden, whip around to a good gardener (often our mums) and steal a couple of stalks. Trust me she'll thank you for it later!

Rhubarb Cupcakes

You will need:

125g softened butter
2/3c firmly packed brown sugar
1/2t vanilla bean paste
pinch salt
2 large eggs
1/2c milk
1 & 1/2c self-raising flour
& 1/2c washed and diced rhubarb
Owl design cupcake cups
plum icing
20g melted butter
1/2c sifted icing sugar
1/3c nougat, cranberries or similar to top

1. To prepare your rhubarb cook it with 2T water for 5+mins until soft. Let it cool. This will reduce to approx 1c of stewed rhubarb.


2. Cream first measure of butter, sugar, vanilla and salt. Whisk eggs and milk and add to butter mixture ever so slowly to combine. (Here is the egg mixture pictured with a sturdy mini whisk I totally recommend for prep jobs). Add the flour and continue mixing on low speed until a thick batter forms. Fold in 1c stewed rhubarb gently. 

3. Fill cupcake cups 2/3 full and arrange them in a 7x3 grid on your tray. Its important to leave space between for them to cook evenly. This recipie makes 21. Bake at 170`C for about 25 mins or until a cake tester comes out clean. 


4. Meanwhile prepare your icing according to packet instructions. This requires a little melted butter and some water. Add icing sugar to turn it into a pipeable consistency. Fill a piping bag that has been fitted with a tip to pipe through. I used wilton tip #109 for the gentle swirls.     


5. When the cupcakes have cooled, decorate with a swirl of the punchy plum icing and top with a thin slice of nougat or some whole dried cranberries. These cupcake papers are thick and robust to travel as well as simply being sweet! In the same range are eye-catching aeroplane, carousel, bluebird, babushka, patchwork paper cup designs and more.

These rhubarb cakes are also beautiful and light served simply with a fine sprinkling of icing sugar. Do it through a paper doily for maximum effect! This  really lets the classic rhubarb and vanilla flavour combination shine through. 

Remember that rhubarb leaves are poisonous so don't be 'helpful' by sticking them in the compost! Simply lay the leaves you cut off around the base of the rhubarb plant to keep moisture in the surrounding soil. They will decompose with time and the gardener will stay happy :-) 


Related Posts Plugin for WordPress, Blogger...