Friday, March 28, 2014

Poppy cupcake toppers - from Kiwicakes test kitchen


Bake for ANZAC day this year and present your delights in these Black Lace cupcake papers. They really set off the center of the poppy.


The topper is formed using this new Poppy silicone mould. To begin, season the mould with a thin smear of Perfect Finish Decorating Cream by rubbing a smear all around. This ensures your topper will unmould with ease. Fill the centre with a tiny circle of black fondant and the leaf cavity with some green fondant as pictured. Lastly push in your red fondant to fill the mould (I used Satin Ice).

Once you have all your materials in front of you it takes no time at all to make these en masse to decorate for an army. As an indication it took me 10 minutes to make 6 poppies.


Order your poppy mould in advance of ANZAC day now!

Wednesday, March 26, 2014

Candy Building Block Cupcakes - from Kiwicakes test kitchen


Add some Candy Blocks to your favourite iced cupcakes to win delighted looks from children. The really authentic look of the blocks will have everybody guessing if they're edible! 

These are a really handy sweet decoration to have on hand in the kitchen for your child that loves to play with Lego.

Monday, March 24, 2014

A Carrot for the Easter Bunny - from Kiwicakes test kitchen


These striking 'carrot' treats are packaged in a cake decorator's best friend - disposable piping bags. They come in a pack of 20 and are clear and unbranded, which make them perfect for this task. The individual piping bags work out at NZ$0.40c each, so they make a very economical packaging option.


Simply fill each piping bag with your goodies (e.g. orange jellybeans) and secure with a limey green curling ribbon.


A great portable treat, these 'carrots' are perfect for Easter gifting.


For those without a sweet tooth (strange people I must say! but they do exist) consider filling the piping bags with readily-available smallish orange cheese chips. Remember to tie the ribbon tight to keep the chips airtight and fresh and these can be prepared well in advance for picnics and outings.


Tuesday, March 18, 2014

Skittles infused Cupcakes


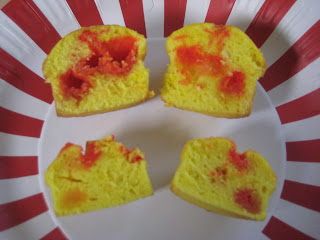
Last year you may recall I made skittles infused vodka. I still have a heap of it I haven't used, so I decided to try skittle cupcakes, as I had plenty of candy, too. I used a regular vanilla cake mix, to which I removed 1/3 cup of water and replaced with 1/3 cup of skittle infused vodka (the alcohol actually bakes out, leaving behind the skittle flavour - it's like using an extract really, so safe for kids to eat).


I tested baking with both whole skittles and skittles cut in half.


The skittles that were cut in half were the most successful in the baked cupcakes. The whole skittles made a big gooey mess, whereas the half skittles made a nice tasty addition when eating the cupcake.


I like the simplicity topped with a single skittle. To my buttercream icing, I added 1Tbsp of skittle infused vodka (replace other liquid you'd normally add). The icing doesn't taste of alcohol, and 1 Tbsp over an entire batch of icing is such a small amount, so the kids can eat this icing, too. Just make sure to put the vodka back on the top shelf, as it's a very enticing colour for kids. 


You can find the circus cupcake papers here.

Friday, March 14, 2014

Handyman's Birthday - from Kiwicakes test kitchen


My dad has always been good at fixing things and taught us kids how to find our way around a toolbox too. He loves to tinker in his garage and emerges with beautifully crafted wooden items. So when it came to this years' birthday I thought what better way to celebrate his skill than with edible tools!


I made his AJ initials with capital letters from this alphabet cutter set. I also adapted the letter S into a number 5 by shaving off one curved edge to straight and a H was easily transformed into a number 4.

The tools were wee blobs of grey fondant pushed into this Silicone Tools Mould and painted with light gold, red and dark silver metallic food paint.

Happy Birthday Dad!

Monday, March 10, 2014

St Paddys Leprechaun - from Kiwicakes test kitchen


This crazy little leprechaun is achieved with a silicone mould, which has arrived just in time for St Paddy's day! Its just a case of pressing fondant in, snap-freezing him, then finishing with the detailing. He is presented a top these cool shamrock cupcake papers


Firstly with any new mould, give it a wash in hot water and let it air-dry. Then season it with a smidgen of crisco vegetable shortening for guaranteed easy-release. Use tiny balls of flesh coloured fondant and press them into your little man's face, ears, hand and pot as pictured above. Roll a thin sausage for the pot's handle and press into place. I love this pre-coloured fondant for skin tone because so many times I have mucked around with a small amount of my peaches and browns and can't seem to get the colour quite right. It also works well as a warm base colour for edible metallic light gold paint as you will see further down the blog.


Next I pressed green satinice fondant into the remainder of the mould.. He only weighs a few grams when completed so we are only talking about tiny amounts of fondant here! When the cavities are full, sit the mould in your freezer for a couple of minutes to firm up the fondant before turning out to release the funny little leprechaun and clover leaf. Release the feet from the leprechaun mould first and then the rest of his body will follow. Use a scalpel to do any microscopic tidying if your skin tone and green have spread a millimeter or two in the wrong direction.


I used light gold metallic paint and the finest paintbrush to highlight his little pot of gold. When he has been at room temperature for a good half an hour he will have hardened with a slight crust all over. Now its time to add wee dots for his eyeballs with an airforce blue edible marker pen and his smile with a red edible marker pen. I tried to do the facial features on mine too early when they were still too 'fresh' and ended up with less-than-perfect lines so it is worth waiting if you have that luxury.


The shamrock silicone mould (included alongside the leprechaun) is super-simple to use and looks really effective with these themed cupcake papers.


You could jazz these cupcakes up even further with the addition of some sprinkles. L-R...

Emerald green non-pareils, Shamrock mix sprinkles, Lime green gloss lustre jimmies.

You will be a hit in the office if you arrive with a tray full of these green goodies next Monday!


Friday, March 7, 2014

Mini gerbera cake


This little fruit cake might not be immediately obvious from  the photo, but it's only 4'' in diameter. It was a simple and quick birthday cake for a family member from a household of 2 people. For people in my family they can be a little daunted by the never ending supply of cake. And I sometimes hear "how am I going to eat all of that?"


To start I mixed 50% orange with 50% white satin ice fondant, to create this peach colour, which I covered the cake board with. I embossed the pattern using an impression mat. Within just 1-2 minutes, you can create a pattern that looks like it took you hours. The small cake is covered in white satin ice fondant and the top is adorned with a peach gerbera flower, made from gumpaste, dusted with flame frenzy edible lustre. The cake is finished with a 4mm pearl border from this mould.
This little cake was well received and I can promise you from start to finish the cake only took about 30 minutes to decorate. I really like the look of a single flower fitting the top diameter of the cake. What do you think?

Monday, March 3, 2014

Savoury Shamrock Stack - from Kiwicakes test kitchen

Today I continued on my St Patrick's day buzz and used our large shamrock cookie cutter to theme a quick but effective savoury snack. Gotta love no-bake, no-fuss options that taste this good.


Savoury Shamrock Stack (serves 6+)

2 packs store-bought spinach flavoured wraps (down the bread aisle)
1 packet of baby rocket leaves (or a large bowlful from your summer garden)
1 packet of onion soup mix
250g pot sour creme
1 cup mayonnaise
100g pottle of pesto 


Combine sour creme, mayo and onion soup mix and chill in advance. 


Check that you will fit two shamrocks out of each wrap then cut in half. The spinach tortillas are greener on one side and browner on the other, so be sure to reserve some nice bright green for the tops. Spread one side with 1 desert spoon of creamy mixture and 1 teaspoon of pesto on the other. These will act as the 'glue' to hold the wraps and rocket together. Fill with a generous handful of rocket (removing any excessive rocket stems) and invert the lid. You can continue building upwards and make your stacks 3 or 4 or 5 or even 6 stacks high, alternating the layers. 


Working on a hard surface like a clean bench top, press the large shamrock cookie cutter through your layers. Simply press the stack out of the cutter gently onto your serving dish to reveal the beauty. You can see how cleanly the cutter slices through the rocket and wraps to make a restaurant-looking item.


This tasty St Paddys day snack goes well with a Guiness and would be great as a picnic meal shared outside. 


We continually add to our range of cookie cutters on offer. There are nearly 30 categories to browse for all your baking, decorating and general kitchen needs.

Related Posts Plugin for WordPress, Blogger...