Tuesday, July 30, 2013

WIlton course 1 cakes from our students

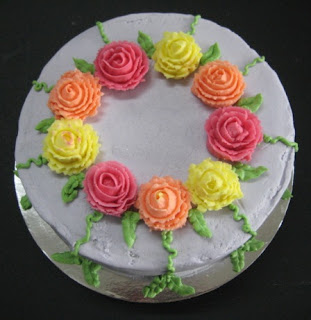
Last night was the final night for my second group of ladies enrolled in the Wilton course 1 - 4 week class. Over my 2 groups of ladies, there has been many laughs, a few stamped feet and a barrel load of fun. Here's some of the finished cakes, from the final night.


I'm looking forward to Fondant & gumpaste with my ladies starting this Thursday afternoon. Watch our classes tab(above for new Wilton classes starting soon)

Monday, July 29, 2013

Newsflash: The Dinosaurs are Extinct - from Kiwicakes test kitchen

This morning marks the start of a new school term, so there are probably many parents breathing a sigh of relief. I start this term with anticipation at the many new and exciting changes for my budding family. My partner started a new job today, my son happily started preschool this morning and my daughter has her school visit morning. Phew!

Being welcomed with a school Powhiri in the glorious sunshine was a lovely start to the day. During the formality my preschoolers were exceptionally well behaved. Then they decided to compare belly buttons as we were centre stage - that sure got some giggles! Talia was confident so I left her there with her new teacher and friends to get settled in. Next stop was preschool for the other kids. My wee man got straight in amongst it and happily waved mum goodbye.

This morning's activities meant that I was a little late to work today. So instead of turning on the oven I thought I could give you an update on the Curious Chocolate Dinosaurs that I made a couple of weeks ago for Talia's preschool leaving cake. Here is the finished product...


My plan to sit the dinosaurs atop a dirty, messy chocolate cake was extinguished by the nearly-birthday-girl who preferred a 'lemon cake please mum'. How could I say no to those lovely manners?! So the cake was bright and it drew gasps from the preschool children. They were eager to name the dinosaurs and to have a taste! I used a grass tip #233 to squirt out the green butter cream randomly on top and more condensed around the base. I popped a candle into the dinosaur's backs, sprinkled them with mini m&ms and it was easy done. At Kiwicakes we have a huge range of candles to suit any occasion so it's worth having a scroll through when ordering your other cake supplies.

I found that my modelling chocolate dinosaurs kept perfect colour and shape just sitting in my winter pantry waiting for their debut on a cake. This picture was taken at preschool 3 days after I modelled them at work and the remnants of the last surviving dinosaurs kept impeccably in my pantry for at least a week afterwards. This is such a cool medium to work with and I am impressed with its keeping qualities. However, our bright dinosaurs are now all extinct!

I would recommend to play it safe and do as I did, sitting the figurines on the butter cream just before serving. They may be less inclined to be volatile against a fondant-covered cake, but that is just my guess! If anybody has already tried this pairing with success I'd love to hear about it.


-->

Tuesday, July 23, 2013

Welcome Royal Baby - from Kiwicakes test kitchen


My good friend Nicola is patriotically English and beside herself with joy today at the arrival of the 3rd in line to the throne - so much so that she decided to host an impromptu British Royal themed dinner tonight!

So I expect to turn up to her house this evening and be overwhelmed with union jacks and the like. In her own words she is "so excited it's ridiculous!"

I hate to turn up anywhere empty handed, so in the spirit of all things British and royal and new babies I whipped up these cupcakes for afters.

The union jack cupcake papers & flags are from our "Best of British" range The sugar icing baby feet are also available in pink & white


Welcome new little man!


Team Kiwicake's - for SPCA Cucpake Day


Today I've registered "Kiwicakes" in the team category for the SPCA Cupcake Day. Laura and I will be baking up a storm in Kiwicakes' test kitchen Monday 26 August (more details to come on the cupcakes that will be available)

Kiwicakes is the official cake supplies sponsor for Cupcake Day - as we've been since its inception - so today I sent an enormous parcel of goodies off to the SPCA. The SPCA is a cause close to my heart and I've had fun baking for the SPCA each year. This year we intend to outdo ourselves!
-->


The SPCA has some pretty cool merchandise to support SPCA Cupcake Day. Last year Minette Hanekom from Red Cherry Design (who designed the Kiwicakes Trixie kiwi logo) designed these awesome tea towels (above). This year Beck Wheeler has made these funky designs (below). You can check out all their cool merchandise here I've just finished placing an order for tea towels, stickers and cupcake cases.

Chelsea Winter, New Zealand's Masterchef 2012 winner, has supplied her cupcake recipe for the SPCA Cupcake Day. The SPCA has granted permission for us to share this with you (click on our photo to print a copy).


Vanilla cupcakes with white chocolate ganache icing (Chelsea Winter)

Makes about 24

Cupcakes
225g butter, at room temperature
2 cups sugar
3 free range eggs, at room temperature
1 ½ teaspoons pure natural vanilla essence
2 ½ cups all-purpose flour
1 ½ tsp baking powder
1 cup milk

Icing
200ml cream
200g good quality white chocolate
 5 cups icing sugar
Freeze-dried raspberries or strawberries (or powder)

Method

Cupcakes
Preheat oven to 180°c. Line 2 x standard 12 pan muffin tins with cupcake liners (24 total – you may need to do in two batches).

Sift the flour and baking powder into a small bowl, stir to combine and set aside.

Cream the butter and sugar with an electric beater or mixer until very pale and fluffy (or you can do it by hand, it will just take longer). Add the eggs, one at a time, beating well after each addition and scraping down the sides with a spatula. Beat in the vanilla essence.

In three parts each, alternate adding the dry ingredients and milk. With each addition, beat only until the ingredients are just incorporated, but at the end the mixture should be smooth. Again, scrape down the sides as you go.

Spoon the batter into the cupcake liners about ¾ full, and bake in middle of the oven for about 15 minutes until they just start to turn golden on top.  Cool the cupcakes in the tins for 10 minutes, then remove and cool completely on a wire rack before icing.

Icing
Melt the white chocolate over a double boiler. Add the cream and mix to combine. Cool, then chill in the fridge for an hour. Beat the mixture until it goes thick and creamy, then beat in the icing sugar until thick and smooth. Pipe or spread the icing on to cupcakes and sprinkle with the raspberries/powder.

Wednesday, July 17, 2013

For the boy that doesn't like cake!


It was my little boy's 7th birthday this weekend past. And shock horror, he doesn't like cake! (Last year we had the Lego themed numeral 6 made from lolly cake here)

This year he decided he was going to choose his own cake. After browsing the internet he decided he wanted a Kitkat and M&M cake. I don't know who to credit with the design, I've seen hundreds of versions of this cake over the years. For my little man, it was all about the lollies - but his friends still got cake.

As a cake decorator, it was far too plain for me, but it made my little man happy. I used a cake bunting banner and a funky numeral candle, to finish it off.

Tuesday, July 16, 2013

Best ever apple Pie - from the Kiwicake's Test Kitchen


I had so much fun making this pie. I've always wondered why pie in the USA has such a following. Entire diners and bakeries seem to revolve around pie. Don't get me wrong, I've eaten pie, I've just never really seen the attraction, UNTIL NOW! The crust on this pie is very different, and in my opinion is what makes it awesome. The pie crust uses Crisco, not butter. It was a revelation, with it tasting great cold and even better warm. I'm keen to try many more pie recipes using Crisco. Special thanks to Jenny for the old pie recipe book she gave me, from which I've adapted the Apple Pie recipe to create my own.

Because of New Zealand's dairy farming history, butter was always much cheaper than it was in other countries. This is one of the reasons, shortenings and lards were not used as much as other countries. Most of our pastry recipes tend to use butter.

I wanted to try out my new Tala retro pie bird and our brand new Fat Daddio's pie pans. The pie bird actually sits in the pan and bakes in the oven with the pie.


I placed the pie bird in the pie crust (your pie crust should blind bake for 15 mins at 200C) and then surrounded with the filling


I cut a hole in the centre of the pie crust once rolled, so I could drop it over the pie bird. I left the crust on the silicone mat while I lined up the hole over the pie bird. Once I had it lined up, I peeled back the silicone and it dropped gently into place. A great way to avoid tearing of your pastry.


Once I had dropped it over the pie bird, I just gently pressed the crust around the pie bird.


I pressed the edges of the crust together with a fork and used pie crust plunger cutters, to create decorative cut outs on the top. I gave it an egg wash, prior to placing in the oven.


Mom's Apple Pie

Preheat oven to 220C

Pastry (makes enough for top & bottom of 9-10'' pie pan)
2 cups flour
1/2 tsp salt
1 cup Crisco
1/4 cup ice water

Mix dry ingredients together, cut shortening into flour (you can use a food processor or pastry blender, or 2 knives cutting in a scissor like motion). It should look like coarse meal. Sprinkle water, 1 tablespoon at a time until dough holds together and forms a ball. Divide in half. Handle as little as possible. I rolled my pastry out on a silicone mat, as this allows you to pick it up without tearing, to place in the pan, and lessens the need for additional flour.

Filling 
700-800g Granny Smith apples (approx 5 large)
1/4 cup caster sugar
1/4 cup brown sugar
2 Tbsp flour
1 tsp cinnamon
1/2 tsp grated lemon rind
1tsp lemon juice
2 Tbsp butter cut into tiny pieces

Mix all ingredients together. Place in pie shell which has been blind baked at 200C for 15 mins. Cap pie with remaining half of pastry. Brush with egg wash. Bake approx 30 mins until golden at 180C. Delicious hot. Great cold.

Dutch Apple Pie variation
Using the recipe above, remove the pie in the last 7-10 minutes of cooking and pour 1/2 cup cream into the pie through the vent. Return to oven to complete baking. You must allow the pie to sit for at least 15 minutes after taking out of the oven before cutting to allow time to set.


Monday, July 8, 2013

Curious Chocolate Dinosaurs - from Kiwicakes test kitchen

This week marks my daughters last day at preschool. Its hard to believe my baby is off to school so soon! I remember looking forward to my last day at kindy because there was always a playdough 'cake' with candles to blow out - so this edible farewell cake sure will be a step up! 

Talia's preschool have been studying dinosaurs this term so I thought I'd stick with that theme for her send-off cake. I was also inspired by the Dinosaur Diorama cake on page 35 of the Wilton 2014 Yearbook. It is glossy and full of new and fun ideas - a great birthday present idea for a crafty friend.  .


Here are my finished chocolate dinosaurs. Today I decided to try working with chocolate instead of fondant for a change. I used a pack of Rainbow Chocolate Modelling Paste and within that I had every colour I needed to get creative! A real advantage of working with this medium is that you don't need anything extra above the basic tools that cake decorators start out with. And the taste is divine!


You can also purchase single blocks of Chocolate Modelling Paste from our range of 11 pre-coloured chocolate.

I figure that my cakes audience are going to be harsh critics because boy do those 3 and 4 year olds know their dinosaur facts! I chose to model 5 different animals as she is turning 5 and odd numbers of cake decorations do seem to work best anyway. Before I began playing with the colours, I made a quick plan including the distinguishing anatomical features that they would be looking for in each dinosaur. It may not be pretty (I am no artist!) but it gave me a plan of action to turn into simple shapes...


Using chocolate paste for the first time was a breeze! It moulds well simply with the warmth of your hand and has a nice glossy finish. I created the extra colours I needed (like orange, purple and green) by mixing the existing colours from the rainbow pack together. Eg. Yellow + Blue = Green.


I am planning on constructing a messy, muddy, maltesers-covered chocolate cake base for these bright dinsaurs to inhabit. And hopefully it will go down well with the pre-schoolers! Here are my characters...


Pterodactyl 


Stegosaurus


T-Rex


Triceratops


Long Neck Fantasy Dinosaur


Monday, July 1, 2013

Tutti Frutti Custard Square - from Kiwicakes test kitchen

Here's an idea to jazz up the humble custard square and inject some colour into your winter! Top it with a punchy passionfruit icing and decorate with cheerful fruit discs as I did today.

This is really just a fancy version of school canteen and bakery custard slice which can be made with staple kitchen ingredients - but it's soooooo satisfying! 


First, I prepared my toppers by colouring and rolling small amounts of fondant 3-4mm thick. Then I used a cookie cutter plunger fruit set of shapes to cut and emboss my decorations. These nifty devices are also available in christmas, cute animals, leaves, safari animals and more. A quick sprinkle of food grade glitter really lifts the shapes and brings them to life. You could use these as cupcake toppers, too.


Then defrost a ready-made 400g rectangular block of puff pastry and cut in half. Roll out each portion on a lined/greased baking tray until you have 2 rectangles of approx 30x40cms. Prick well all over with a fork and bake each at 180' for 15 minutes until golden.


While the pastry was cooking I mixed up my fruity icing. I love passionfruit, but with it being out of season the same full flavour can be achieved using a freeze-dried fruit powder (and without the off-putting hard black bits!). Melt 25g butter and add 6T boiling water, 2c icing sugar and 2t passionfruit powder. Mix until smooth, adding more hot water if needed to get a spreadable consistency.

Once your pastry sheets are out and cooling you can make up a quick and thick custard. Using your biggest microwavable bowl whisk together 1c custard powder, 1c caster sugar and 1/2c milk. Once combined add another 4 1/2c milk and stir. Microwave for 10-15mins (checking and whisking every 2mins) until custard is thick and goopy and looks like it will hold its own shape when cool.


To construct, top one pastry sheet with the warm custard and then invert the second pastry sheet on top, to give you a nice flat surface to ice with your tangy passionfruit icing. Chill for a good hour until the custard cools and sets, then cut into 12 or more squares and top with your fruity decorations.


Serve at a party, for dessert, or an anytime uplifting winter treat!

Kiwicake's in Herald on Sunday article.


It was lovely to receive a mention in the Hearld on Sunday newspaper this weekend past. You can read the full article here it seems we are the favourite for cake decorating supplies in NZ for the author's sister-in-law.
Related Posts Plugin for WordPress, Blogger...