Cookie Cutter Texture Sets- Mini Wedding SetDecorate cookies using the texture mats for a simple way to get an elegant, professional-looking design, or enhance and embellish the textured cookie with flowers or icing.
Mini wedding set includes 2 cutters, 2-1/4" dress and 2" cake and three different texture mats, each with two designs. Cookie recipe included.
Click here to buy mini wedding set
Painted and Pearl Mini Wedding Cookies

Tools and Ingredientsmini wedding cookie cutter texture set
white fondant
blue gel coloring
yellow gel colouring
green gel colouring
pink gel colouring
fine brush
Lightly spray one mini wedding texture mat from mini wedding cookie cutter texture set. Wipe off excess with a paper towel. Roll white fondant to approximately 1/8" thickness. Place texture mat on fondant. Firmly roll over the mat. Remove mat. Cut textured fondant (both the dress and cake) with appropriate cookie cutter from set. Dust with pearl lustre. Attach to a baked and cool wedding cake and dress cookie with piping gel or a thin layer of buttercream. Repeat with other texture mats to have one of each style of cookie. Thin gel food coloring with a few drops of water (a paint tray works great for multiple colors). Use the brush to paint over details of flowers, bow on dress, bow on cake and scrolls on dress.
Mini Wedding Cookie Bouquets

Tools and Ingredients
mini wedding cookie cutter texture set
white fondant
pearl lustre
candy clay
pearlized white jimmies
terracotta pot
Lightly spray one mini wedding texture mat from mini wedding cookie cutter texture set. Wipe off excess with a paper towel. Roll white fondant to approximately 1/8" thickness. Place texture mat on fondant. Firmly roll over the mat. Remove mat. Cut textured fondant (both the dress and cake) with appropriate cookie cutter from set. Dust with pearl lustre. Attach each to baked and cool wedding cake and dress cookie (insert 6” paper sucker stick into cookie before baking) with piping gel or a thin layer of buttercream. Repeat with other texture mats to create multiple pots. Wrap candy clay in plastic wrap and push to bottom of pot. Insert sucker sticks and fill remainder of pot with pearlized jimmies.
Perwinkle and Fuschia Mini Wedding Cookies

Tools and Ingredients
mini wedding cookie cutter texture set
white fondant
periwinkle fondant
fuchsia fondant
periwinkle royal icing
fuchsia royal icing
pearl spray
parchment cone or a pastry bag with a #1 tip
small flower blossom plunger cutter
mini daisy plunger cutter
Dot dress and cake: Lightly spray dot mini wedding texture mat from mini wedding cookie cutter texture set. Wipe off excess with a paper towel. Roll white fondant to approximately 1/8" thickness. Place texture mat on fondant. Firmly roll over the mat. Remove mat. Cut textured fondant (both dress and cake) with appropriate cookie cutter from set. Cut top and bottom of dress to remove the band. Spray all pieces with pearl spray. Roll out fuchsia fondant and cut replacement band. Attach to baked and cool wedding cake and dress cookie (both white and fuchsia parts) with piping gel or a thin layer of buttercream. Use fuchsia royal icing, thinned with a bit of water, to pipe a row of small dots along the bottom edge of the top and bottom tier and at the intersection of the quilting on the middle tier of the cake. Use periwinkle royal icing, thinned with a bit of water, to pipe over the stripes on the bottom tier, to pipe a row of dots as the bottom border on the middle tier and on top of the dots on the top tier. Roll periwinkle fondant very thin and cut out three small blossoms using plunger cutter. Attach to cake at the top of the swags with a small dot of royal icing. Fill centers of flowers with thinned fuchsia royal icing. Roll fuchsia fondant very thin and cut out one small daisy using plunger cutter. Attach to dress at band with a small dot of royal icing. Fill center of flower with thinned periwinkle royal icing.
Bow dress and cake: Lightly spray bow mini wedding texture mat from mini wedding cookie cutter texture set. Wipe off excess with a paper towel. Roll white fondant to approximately 1/8" thickness. Place texture mat on fondant. Firmly roll over the mat. Remove mat. Cut textured fondant (both dress and cake) with appropriate cookie cutter from set. Cut dress at waist and remove top. Spray cake with pearl spray. Roll out periwinkle fondant and place texture mat on fondant. Firmly roll over the mat. Remove mat. Cut textured fondant (just dress) with appropriate cookie cutter from set. Cut dress at waist and remove bottom part. Attach to baked and cool wedding cake and dress cookie (both white and periwinkle parts) with piping gel or a thin layer of buttercream. Use fuchsia royal icing, thinned with a bit of water, to pipe flower petals on top of dress. Use periwinkle royal icing, thinned with a bit of water, to pipe centers of flowers on dress top and randomly all over cake. Press small ball of fuchsia fondant into bow design on texture mat for both the dress and cake. Press firmly into cavity and remove excess fondant. Use a straight pin to gently remove bow (may be easier to form in separate pieces) and attach to cookie on top of the raised bow with piping gel or royal icing.
Flower dress and cake: Lightly spray flower mini wedding texture mat from mini wedding cookie cutter texture set. Wipe off excess with a paper towel. Roll white fondant to approximately 1/8" thickness. Place texture mat on fondant. Firmly roll over the mat. Remove mat. Cut textured fondant (just cake) with appropriate cookie cutter from set. Spray cake with pearl spray. Roll out periwinkle fondant and place texture mat on fondant. Firmly roll over the mat. Remove mat. Cut textured fondant (just dress) with appropriate cookie cutter from set. Attach to baked and cool wedding cake and dress cookie with piping gel or a thin layer of buttercream. Roll periwinkle, fuchsia and white fondant very thin and cut a variety of small flowers using plunger cutters. Make centers for the flowers by piping a different colored thinned royal icing in middle of flower. Attach flowers to raised impressions on cake with small dots of royal icing or piping gel. Use fuchsia royal icing, thinned with a bit of water, to pipe small dots on dress.
Brown and Pink Mini Wedding Cookie Bouquets

Tools and Ingredients
mini wedding cookie cutter texture set
chocolate fondant
pink fondant
pink royal icing
parchment cone or a pastry bag with a #1 tip
brown and pink M&M’s® candy
dark brown candy clay
pink and brown ribbon
vase or pot
Lightly spray bow mini wedding texture mat from mini wedding cookie cutter texture set. Wipe off excess with a paper towel. Roll chocolate fondant to approximately 1/8" thickness. Place texture mat on fondant. Firmly roll over the mat. Remove mat. Cut textured fondant (just the dress) with appropriate cookie cutter from set. Lightly spray flower mini wedding texture mat from mini wedding cookie cutter texture set. Wipe off excess with a paper towel. Roll chocolate fondant to approximately 1/8" thickness. Place texture mat on fondant. Firmly roll over the mat. Remove mat. Cut textured fondant (just the cake) with appropriate cookie cutter from set. Attach each to baked and cool wedding cake and dress cookie (insert 6” paper sucker stick into cookie before baking) with piping gel or a thin layer of buttercream. Use pink royal icing, thinned with a bit of water, to pipe a row of small dots along the bottom edge of each tier and to trace over the flowers on both the dress and cake. Press small ball of pink fondant into bow design on texture mat. Press firmly into cavity and remove excess fondant. Use a straight pin to gently remove bow (may be easier to form in separate pieces) and attach to cookie on top of the raised bow with piping gel or royal icing. Fill vase or pot with candy clay or brown and pink M&M’s® and insert sucker sticks. Tie bow with brown and pink ribbon around vase.
Green and Blue Mini Wedding Cake Cookies
 Tools and Ingredients
mini wedding cookie cutter texture set
white fondant
purple fondant
green fondant fondant
medium blue fondant
light blue fondant
purple royal icing
green royal icing
light blue royal icing
parchment cone or a pastry bag with a #1 tip
small flower blossom plunger cutter
mini daisy plunger cutter
Bow wedding cake: Lightly spray bow mini wedding texture mat from mini wedding cookie cutter texture set. Wipe off excess with a paper towel. Roll white fondant to approximately 1/8" thickness. Place texture mat on fondant. Firmly roll over the mat. Remove mat. Cut textured fondant (just cake) with wedding cake cookie cutter from set. Attach piece to a baked and cool wedding cake cookie with piping gel or a thin layer of buttercream. Use green royal icing, thinned with a bit of water, to pipe a row of small dots along the bottom edge of each tier. Use blue royal icing, thinned with a bit of water, to pipe rows of triple dots all over cake. Press small ball of purple fondant into bow design on texture mat. Press firmly into cavity and remove excess fondant. Use a straight pin to gently remove bow (may be easier to form in separate pieces) and attach to cookie on top of the raised bow with piping gel or royal icing.
Stripes and dots cake: Lightly spray stripes and dots texture mat from mini wedding cake cookie cutter texture set. Wipe off excess with a paper towel. Roll purple fondant to approximately 1/8" thickness. Place texture mat on orange fondant. Firmly roll over the mat. Remove mat. Cut textured fondant with cookie cutter from set. Cut the bottom tier and attach to a baked and cool wedding cake cookie with piping gel or a thin layer of buttercream. Roll medium blue fondant to approximately 1/8" thickness. Place texture mat on fondant. Firmly roll over the mat. Remove mat. Cut textured fondant with cookie cutter from set. Cut the middle tier and attach to a baked and cool wedding cake cookie with piping gel or a thin layer of buttercream. Roll green fondant to approximately 1/8" thickness. Place texture mat on fondant. Firmly roll over the mat. Remove mat. Cut textured fondant with cookie cutter from set. Cut the top tier and attach to a baked and cool wedding cake cookie with piping gel or a thin layer of buttercream. Use purple royal icing, thinned with a bit of water, to pipe on top of impressed dots on top tier and to pipe a row of small dots as a bottom border for the middle tier. Use blue royal icing, thinned with a bit of water, to pipe on dots going up the stripes on the bottom tier and to pipe a row of small dots as a bottom border for the top tier. Use green royal icing, thinned with a bit of water, to pipe on swags on the bottom tier. to pipe a row of small dots as a bottom border for the bottom tier and to pipe small dots at the intersection of the quilting on the middle tier. Roll light blue fondant very thin and cut out three small blossoms using a plunger cutter. Attach the flowers to the cake with a small dot of royal icing or piping gel at the top of each swag. Use thinned purple royal icing to pipe centers for the flowers.
Flower wedding cake: Lightly spray flower mini wedding texture mat from mini wedding cookie cutter texture set. Wipe off excess with a paper towel. Roll green fondant to approximately 1/8" thickness. Place texture mat on fondant. Firmly roll over the mat. Remove mat. Cut textured fondant (just cake) with wedding cake cookie cutter from set. Attach piece to a baked and cool wedding cake cookie with piping gel or a thin layer of buttercream. Use purple royal icing, thinned with a bit of water, to pipe a row of small dots along the bottom edge of each tier. Roll light blue, purple and white fondant very thin and cut a variety of small flowers using plunger cutters. Make centers for the flowers by shaping small balls of the same colours of fondant. Attach different colored centers to flowers and flowers to raised impressions on cake with small dots of royal icing or piping gel.
Cookie Cutter Texture Set- Mini Baby SetDecorate cookies using the texture mats for a simple way to get an elegant, professional-looking design, or enhance and embellish the textured cookie with flowers or icing.
Mini baby set includes 2 cutters, 1-7/8" bib and 2" onesie and three different texture mats, each with two designs. Cookie recipe included.
Click here to buy Bib & onsie cookie cutter set
Baby Girl Bib Cookies

Tools and Ingredients
mini baby cookie cutter texture set
pink fondant
purple fondant
yellow fondant
light yellow royal icing
light pink royal icing
light purple royal icing
Parchment cone or a pastry bag with a #1 tip
black food marker
orange food marker
small flower blossom plunger cutter
mini daisy plunger cutter
Rubber ducky bib: Lightly spray rubber ducky mini baby texture mat from mini baby cookie cutter texture set. Wipe off excess with a paper towel. Roll purple fondant to approximately 1/8" thickness. Place texture mat on fondant. Firmly roll over the mat. Remove mat. Cut textured fondant (just bib) with bib cookie cutter from set. Cut away inside part, leaving only the border edge. Lightly spray rubber ducky mini baby texture mat from mini baby cookie cutter texture set. Wipe off excess with a paper towel. Roll pink fondant to approximately 1/8" thickness. Place texture mat on fondant. Firmly roll over the mat. Remove mat. Cut textured fondant (just bib) with bib cookie cutter from set. Cut away outside part, leaving only inside the border. Attach both the pink and purple pieces to a baked and cool bib cookie with piping gel or a thin layer of buttercream, make sure the adjoining edges line up to each other nicely. Use yellow royal icing, thinned with a bit of water, to pipe small stitching details on the inside edge of the purple border. Press small ball of yellow fondant into rubber duck design on texture mat. Press firmly into cavity and remove excess fondant. Use a straight pin to gently remove rubber ducky and attach to each cookie on top of the raised rubber ducky with piping gel or a thin layer of buttercream. Use the orange food marker to color the duck’s nose orange and make one dot with the black food marker for the eye.
Yellow polka dot bib:
Lightly spray stripes and dots mini baby texture mat from mini baby cookie cutter texture set. Wipe off excess with a paper towel. Roll yellow fondant to approximately 1/8" thickness. Place texture mat on fondant. Firmly roll over the mat. Remove mat. Cut textured fondant (just bib) with bib cookie cutter from set. Attach the piece to a baked and cool bib cookie with piping gel or a thin layer of buttercream. Roll pink and purple fondant very thin. Use the small flower blossom plunger cutter and the mini daisy plunger cutter to cut two of each colour. Attach the smaller flower to the opposite color of a larger daisy with a small dot of royal icing. Attach randomly 4, two layer flowers to the cookie. Use yellow royal icing to pipe a small dot in the center of each flower. Use pink and purple royal icing, thinned with a bit of water, to pipe random dots all over inside part of bib. Use thinned pink royal icing to pipe stitching on inside of bib border.
“ABC” bib:
Lightly spray abc mini baby texture mat from mini baby cookie cutter texture set. Wipe off excess with a paper towel. Roll purple fondant to approximately 1/8" thickness. Place texture mat on fondant. Firmly roll over the mat. Remove mat. Cut textured fondant (just bib) with bib cookie cutter from set. Attach the piece to a baked and cool bib cookie with piping gel or a thin layer of buttercream. Roll pink and yellow fondant very thin. Use the small flower blossom plunger cutter to cut one pink blossom and the mini daisy plunger cutter to cut one yellow daisy. Attach the smaller flower to the larger daisy with a small dot of royal icing. Attach to the upper left hand corner of the cookie. Use purple royal icing to pipe a small dot in the center of the flower. Use pink royal icing, thinned with a bit of water, to pipe a thick border around the edge of the cookie and small dots on the inside of the border. Use thinned yellow royal icing to pipe small dots evenly spaced just inside the edge of the cookie.
Pastel ABC baby cookies

Tools and Ingredientsmini baby cookie cutter texture set
green fondant
light yellow royal icing
light pink royal icing
light blue royal icing
Parchment cone or a pastry bag with a #1 tip
Lightly spray abc mini baby texture mat from mini baby cookie cutter texture set. Wipe off excess with a paper towel. Roll green fondant to approximately 1/8" thickness. Place texture mat on fondant. Firmly roll over the mat. Remove mat. Cut textured fondant (both bib and onesie) with appropriate cookie cutter from set. Attach to baked and cool bib and onesie cookie with piping gel or a thin layer of buttercream. Thin each colour of royal icing by adding a small amount of water. Pipe over each letter of the “abc” with a different colour. On the onesie pipe small dots in a random pattern all over on the bib pipe small dots in repeating order just inside the edge of the border of the bib.
Pastel Baby Mini Cookie Bouquet

Tools and Ingredientsmini baby cookie cutter texture set
blue fondant
yellow fondant
pink fondant
purple fondant
green fondant
orange fondant
pastel M&M’s® candy
candy clay
vase or pot
Lightly spray one texture mat from mini baby cookie cutter texture set. Wipe off excess with a paper towel. Roll one color fondant to approximately 1/8" thickness. Place texture mat on fondant. Firmly roll over the mat. Remove mat. Cut textured fondant (both bib and onesie) with appropriate cookie cutter from set. Attach to baked and cool bib and onesie cookie (insert 6” paper sucker stick into cookie before baking) with piping gel or a thin layer of buttercream. Repeat with all the different mats using all 6 colors of fondant. Wrap ball of candy clay in plastic wrap and place in bottom of vase or pot. Insert sucker sticks into candy clay to form a bouquet. Fill vase or pot to top with pastel M&M’s® candy.
Rubber Ducky Baby Cookies

Tools and Ingredients
mini baby cookie cutter texture set
medium blue fondant
yellow fondant
orange food marker
black food marker
Lightly spray rubber ducky mini baby texture mat from mini baby cookie cutter texture set. Wipe off excess with a paper towel. Roll blue fondant to approximately 1/8" thickness. Place texture mat on fondant. Firmly roll over the mat. Remove mat. Cut textured fondant (both bib and onesie) with appropriate cookie cutter from set. Attach to baked and cool bib and onesie cookie with piping gel or a thin layer of buttercream. Press small ball of yellow fondant into rubber duck design on texture mat. Press firmly into cavity and remove excess fondant. Use a straight pin to gently remove rubber ducky and attach to each cookie on top of the raised rubber ducky with piping gel or a thin layer of buttercream. Use the orange food marker to colour the duck’s nose orange and make one dot with the black food marker for the eye.


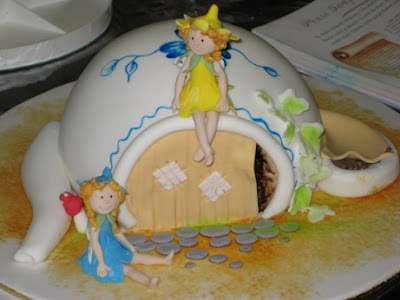
 Yesterday I attended a workshop with the Oh-so-Talented Debbie Brown (cake decorator extraordinaire.) We had a fantastic day, with Whangarei cake decorators guild members and visitors (including Malinda who had driven all the way from palmerston North). Debbie is an amazing teacher, very down to earth. She told us some great stories, and we were constantly laughing. That's my finished wedding couple above. A shot of Debbies couple she demonstrated is below.
 I learnt some great hints & tips along the way, which will surely make my cakes better. And after having made these figures, which dDebbie repeated many times trhoughout the day "are made from ball shapes, tear drop shapes & sausages - anyone can do it, if you're shown how". She also stressed how important it was to realise there is no "right way", take her ideas and give them your own twist. She also divulged - none of the cakes in her books are airbrushed. And many have a leaf "just there", or embellishment "there" to hide a cake crumb or imperfection in the icing (been there done that myself)